github
地址
1、工厂模式
1.1 简单工厂
- 定义一个图形抽象类,类中添加绘制图形的纯虚函数,球形类和长方体继承该图形抽象类,并重写纯虚函数.
- 定义一个工厂 Factory 用于创建图形.工厂中有个 create
函数可以根据传入的参数 new 一个相应的图形并返回.
1
2
3
4
5
6
7
8
9
10
11
12
13
14
15
16
17
18
19
20
21
22
23
24
25
26
27
28
29
30
31
32
33
34
35
36
37
38
39
40
41
42
43
44
45
46
47
48
49
50
51
52
53
54
55
56
57
58
59
60
61
62
63
64
|
#include "iostream"
enum GRAPHICS_TYPE{
SPHERE,
CUBE
};
class Graphics{
public:
virtual void painter() = 0;
};
class Sphere : public Graphics{
public:
void painter() override{
std::cout << "绘制球形"<<std::endl;
}
};
class Cube : public Graphics{
public:
void painter() override{
std::cout << "绘制长方体"<<std::endl;
}
};
class Factory{
public:
static Graphics* createGraphics(enum GRAPHICS_TYPE type){
switch (type) {
case SPHERE:
return new Sphere;
break;
case CUBE:
return new Cube;
break;
default:
return nullptr;
}
}
};
int main(){
Graphics* graphics = Factory::createGraphics(GRAPHICS_TYPE::SPHERE);
graphics->painter();
graphics = Factory::createGraphics(GRAPHICS_TYPE::CUBE);
graphics->painter();
return 0;
}
|
1.2 工厂方法模式
简单工厂每次新增创建图形类,就需要修改 Factory
工厂的创建方法,违反了开放开放封闭原则。
使用工厂模式为每个图形添加一个工厂。
- 定义一个图形抽象类,类中添加绘制图形的纯虚函数,球形类和长方体继承该图形抽象类,并重写纯虚函数.
- 定义一个抽象工厂
Factory,纯虚函数创建图形.创建球形工厂和创建长方体工厂继承自该工厂。并重写纯虚函数。
1
2
3
4
5
6
7
8
9
10
11
12
13
14
15
16
17
18
19
20
21
22
23
24
25
26
27
28
29
30
31
32
33
34
35
36
37
38
39
40
41
42
43
44
45
46
47
48
49
50
51
52
53
54
55
56
57
58
59
60
61
62
63
64
65
|
#include "iostream"
class Graphics{
public:
virtual void painter() = 0;
};
class Sphere : public Graphics{
public:
void painter() override{
std::cout << "绘制球形"<<std::endl;
}
};
class Cube : public Graphics{
public:
void painter() override{
std::cout << "绘制长方体"<<std::endl;
}
};
class Factory{
public:
virtual Graphics* createGraphics() = 0;
};
class SphereFactory : public Factory{
public:
Graphics * createGraphics() override{
return new Sphere;
}
};
class CubeFactory : public Factory{
public:
Graphics * createGraphics() override{
return new Cube;
}
};
int main(){
Graphics* graphics;
SphereFactory sphereFactory;
graphics = sphereFactory.createGraphics();
graphics->painter();
CubeFactory cubeFactory;
graphics = cubeFactory.createGraphics();
graphics->painter();
return 0;
}
|
1.3 抽象工厂
是工厂方法模式的一种演变。有时候我们需要创建静态或者会动的球形或者长方体,抽象工厂应运而生。
- 定义一个图形抽象类,类中添加绘制图形的纯虚函数,球形类和长方体继承该图形抽象类,并重写纯虚函数.
- 定义一个抽象工厂
Factory,纯虚函数创建图形.创建球形工厂和创建长方体工厂继承自该工厂。并重写纯虚函数。
1
2
3
4
5
6
7
8
9
10
11
12
13
14
15
16
17
18
19
20
21
22
23
24
25
26
27
28
29
30
31
32
33
34
35
36
37
38
39
40
41
42
43
44
45
46
47
48
49
50
51
52
53
54
55
56
57
58
59
60
61
62
63
64
65
66
67
68
69
70
71
72
73
74
75
76
77
78
79
80
81
82
83
84
85
86
87
88
89
90
91
92
93
94
95
96
97
98
99
100
101
102
103
104
|
#include "iostream"
class StaticGraphics{
public:
virtual void painter() = 0;
};
class StaticSphere : public StaticGraphics{
public:
void painter() override{
std::cout << "绘制静态球体"<<std::endl;
}
};
class StaticCube : public StaticGraphics{
public:
void painter() override{
std::cout << "绘制静态长方体"<<std::endl;
}
};
class DynamicGraphics{
public:
virtual void painter() = 0;
};
class DynamicSphere : public DynamicGraphics{
public:
void painter() override{
std::cout << "绘制动态球体"<<std::endl;
}
};
class DynamicCube : public DynamicGraphics{
public:
void painter() override{
std::cout << "绘制动态长方体"<<std::endl;
}
};
class Factory{
public:
virtual StaticGraphics* createStaticGraphics() = 0;
virtual DynamicGraphics* createDynamicGraphics() = 0;
};
class SphereFactory : public Factory{
public:
StaticGraphics * createStaticGraphics() override{
return new StaticSphere;
}
DynamicGraphics * createDynamicGraphics() override{
return new DynamicSphere;
}
};
class CubeFactory : public Factory{
public:
StaticGraphics * createStaticGraphics() override{
return new StaticCube;
}
DynamicGraphics * createDynamicGraphics() override{
return new DynamicCube;
}
};
int main(){
SphereFactory sphereFactory;
CubeFactory cubeFactory;
StaticGraphics* staticGraphics;
DynamicGraphics* dynamicGraphics;
staticGraphics = sphereFactory.createStaticGraphics();
dynamicGraphics = sphereFactory.createDynamicGraphics();
staticGraphics->painter();
dynamicGraphics->painter();
staticGraphics = cubeFactory.createStaticGraphics();
dynamicGraphics = cubeFactory.createDynamicGraphics();
staticGraphics->painter();
dynamicGraphics->painter();
return 0;
}
|
2、策略模式
将一个类的行为委托给另一个类实现。
策略模式是指定义一系列的算法,把它们一个个封装起来,并且使它们可相互替换。
这里以 Cache 中的替换算法举例。本案例中 Cache 中 replaceAlgorithm
不自己实现,通过其他算法类实现。
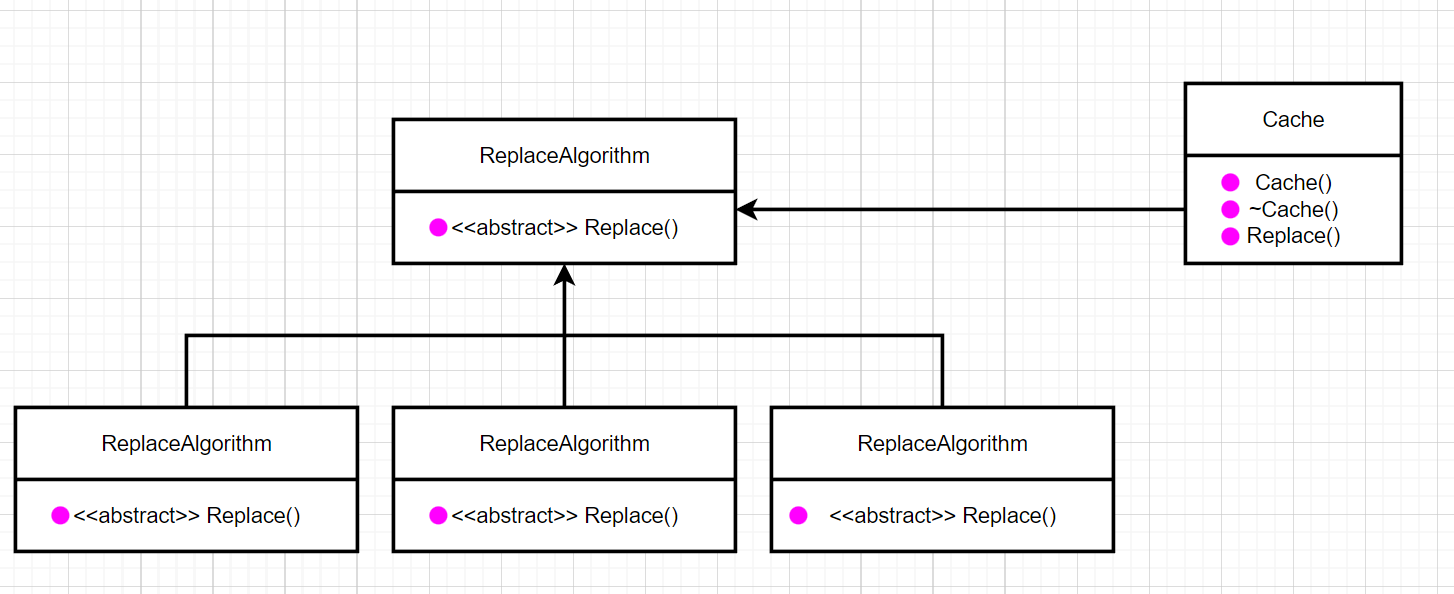 image.png
1、定义算法类
1
2
3
4
5
6
7
8
9
10
11
12
13
14
15
16
17
18
19
20
21
22
23
| class ReplaceAlgorithm{
public:
virtual void replace() = 0;
};
class FIFO_ReplaceAlgorithm : public ReplaceAlgorithm{
public:
void replace() override{
std::cout << "FIFO_ReplaceAlgorithm被调用" << std::endl;
}
};
class LRU_ReplaceAlgorithm : public ReplaceAlgorithm{
public:
void replace() override{
std::cout << "LRU_ReplaceAlgorithm被调用" << std::endl;
}
};
class Random_ReplaceAlgorithm : public ReplaceAlgorithm{
public:
void replace() override{
std::cout << "Random_ReplaceAlgorithm被调用" << std::endl;
}
};
|
实现 Cache 调用上述算法有 3 种方法
- 构造函数传入算法对象;
- 构造函数传入算法类型,在构造函数中 new 一个算法;
- 避免传入参数,使用模板实现。
方法一
1
2
3
4
5
6
7
8
9
10
11
12
13
14
15
16
17
18
19
20
21
22
23
24
25
26
27
|
class Cache{
private:
ReplaceAlgorithm *m_ra;
public:
Cache(ReplaceAlgorithm *ra):m_ra(ra){};
~Cache(){
delete m_ra;
};
void replaceAlgorithm(){
m_ra->replace();
}
};
int main()
{
Cache cache(new FIFO_ReplaceAlgorithm());
Cache cache1(new LRU_ReplaceAlgorithm());
Cache cache2(new Random_ReplaceAlgorithm());
cache.replaceAlgorithm();
cache1.replaceAlgorithm();
cache2.replaceAlgorithm();
}
|
方法二
1
2
3
4
5
6
7
8
9
10
11
12
13
14
15
16
17
18
19
20
21
22
23
24
25
26
27
28
29
30
31
32
33
34
35
36
37
38
39
40
41
42
43
44
| enum ALGORITHM_TYPE{
FIFO,
LRU,
RANDOM
};
class Cache{
private:
ReplaceAlgorithm *m_ra;
public:
Cache(enum ALGORITHM_TYPE type){
switch (type) {
case FIFO:
m_ra = new FIFO_ReplaceAlgorithm;
break;
case LRU:
m_ra = new LRU_ReplaceAlgorithm;
break;
case RANDOM:
m_ra = new Random_ReplaceAlgorithm;
break;
default:
m_ra = nullptr;
} };
~Cache(){
delete m_ra;
};
void replaceAlgorithm(){
m_ra->replace();
}
};
int main(){
方法二
Cache cache(ALGORITHM_TYPE::FIFO);
cache.replaceAlgorithm();
Cache cache1(ALGORITHM_TYPE::LRU);
cache1.replaceAlgorithm();
Cache cache2(ALGORITHM_TYPE::RANDOM);
cache2.replaceAlgorithm();
}
|
方法三
1
2
3
4
5
6
7
8
9
10
11
12
13
14
15
16
17
| template <class RA>
class Cache{
private:
RA m_ra;
public:
Cache(){};
~Cache(){};
void replaceAlgorithm(){
m_ra.replace();
}
};
int main(){
Cache<FIFO_ReplaceAlgorithm> cache;
cache.replaceAlgorithm();
return 0;
}
|
这里需要注意,使用这一种方法时,m_ra
不能是一个指针,写成指针的形式,只是将 FIFO_ReplaceAlgorithm
传入过来,并没有实例化对象。如果非要写成指针形式,需要自己 new
对象。
1
2
3
4
5
6
7
8
9
10
11
12
13
14
15
16
17
| template <class RA>
class Cache{
private:
RA *m_ra = new RA;
public:
Cache(){};
~Cache(){};
void replaceAlgorithm(){
m_ra-:>replace();
}
};
int main(){
Cache<FIFO_ReplaceAlgorithm> cache;
cache.replaceAlgorithm();
return 0;
}
|
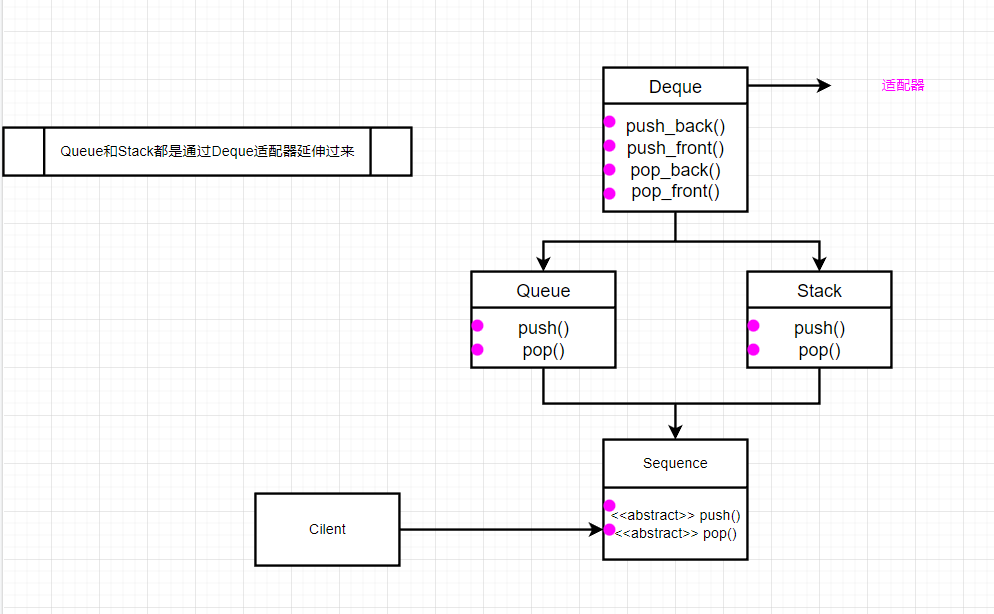
3、适配器模式
C++适配器模式(Adapter
Pattern)是一种结构型设计模式,它允许将不兼容的接口转换为客户端希望的接口。
适配器模式通常使用在以下场景:
- 当已有的类无法满足客户端的需求时,可以使用适配器模式对已有类的接口进行转换,以满足客户端的需求。
- 当需要使用某个类,但该类的接口与另一个类的接口不兼容时,可以使用适配器模式进行转换。
适配器模式通常包含以下角色:
- 目标接口(Target):客户端希望使用的接口。
- 源接口(Adaptee):已有的接口,需要被转换。
- 适配器(Adapter):实现目标接口,并通过调用源接口的方法,实现目标接口与源接口的适配
适配器模式可以分为类适配器模式和对象适配器模式:
- 类适配器模式:使用继承的方式实现适配器。
- 对象适配器模式:使用组合的方式实现适配器。
 代码示例
代码示例
1
2
3
4
5
6
7
8
9
10
11
12
13
14
15
16
17
18
19
20
21
22
23
24
25
26
27
28
29
30
31
32
33
34
35
36
37
38
39
40
41
42
43
44
45
46
47
48
49
50
51
52
53
54
55
56
57
58
59
60
61
62
63
64
65
66
67
|
#include "iostream"
class Deque{
public:
void push_back(int x){
std::cout << "Deque push_back" << std::endl;
}
void push_front(int x){
std::cout << "Deque push_front" << std::endl;
}
void pop_back(){
std::cout << "Deque pop_back" << std::endl;
}
void pop_front(){
std::cout << "Deque pop_front" << std::endl;
}
};
class Sequence{
public:
virtual void push(int x) = 0;
virtual void pop() = 0;
};
class Stack : public Sequence{
public:
void push(int x) override{
deque.push_back(x);
}
void pop() override{
deque.pop_back();
};
private:
Deque deque;
};
class Queue : public Sequence{
public:
void push(int x) override{
deque.push_front(x);
}
void pop() override{
deque.pop_front();
};
private:
Deque deque;
};
int main(){
Sequence *s1 = new Stack();
Sequence *s2 = new Queue();
s1->push(1);
s1->pop();
s2->push(1);
s2->pop();
return 0;
}
|
4、单例模式
单例模式是一种常见的软件设计模式,它保证一个类只有一个实例,并且提供一个全局访问点来访问该实例。
在单例模式中,通常会将类的构造函数私有化,以避免外部代码直接创建该类的对象实例。同时,该类会定义一个静态方法或静态成员变量来访问类的唯一实例。如果该实例不存在,则该静态方法或成员变量会创建一个新的实例,并返回该实例;如果实例已经存在,则直接返回该实例。
单例模式的优点是:
- 保证系统中只有一个实例,减少了资源的占用,避免了不必要的内存浪费。
- 对于某些需要频繁创建和销毁对象的场景,使用单例模式可以减少系统的开销。
- 单例模式可以全局访问,方便统一管理和调用。
单例模式也存在一些缺点:
- 单例模式会对代码的可测试性造成影响,因为单例实例在整个系统中只存在一个,很难进行单元测试。
- 单例模式的实现有时会牵扯到复杂的线程同步操作,如果实现不当,可能会导致死锁等问题。
1
2
3
4
5
6
7
8
9
10
11
12
13
14
15
16
17
18
19
20
21
22
23
24
25
26
27
28
29
30
31
32
33
34
35
36
37
38
39
40
41
42
43
44
45
46
47
48
49
50
51
52
53
54
55
56
57
58
59
60
61
62
63
64
65
66
67
68
69
70
71
72
73
74
75
76
77
78
79
80
81
82
83
84
85
86
87
88
89
90
|
class Singleton
{
public:
static Singleton *getInstance(const char *name);
virtual void show(){};
~Singleton()
{
cout << "Singleton析构函数调用" << endl;
singleton = nullptr;
delete singleton;
};
protected:
Singleton()
{
cout << "Singleton构造函数调用" << endl;
};
private:
static Singleton *singleton;
};
class SingletonA : public Singleton
{
friend class Singleton;
public:
void show()
{
std::cout << "SingletonA的show调用" << std::endl;
}
~SingletonA()
{
cout << "SingletonA析构函数调用" << endl;
};
private:
SingletonA()
{
cout << "SingletonA构造函数调用" << endl;
};
};
class SingletonB : public Singleton
{
friend class Singleton;
public:
void show()
{
std::cout << "SingletonB的show调用" << std::endl;
}
~SingletonB()
{
cout << "SingletonB析构函数调用" << endl;
};
private:
SingletonB()
{
cout << "SingletonB构造函数调用" << endl;
};
};
Singleton *Singleton::singleton = nullptr;
Singleton *Singleton::getInstance(const char *name)
{
if (singleton == nullptr)
{
if (strcmp(name, "singletonA") == 0)
{
singleton = new SingletonA();
}
else if (strcmp(name, "singletonB") == 0)
{
singleton = new SingletonB();
}
else
{
singleton = new Singleton();
}
}
return singleton;
}
|
测试
1
2
3
4
5
6
7
8
9
| int main()
{
Singleton *st = Singleton::getInstance("singletonA");
st->show();
delete st;
st = Singleton::getInstance("singletonB");
st->show();
return 0;
}
|
如果不 delete 掉 st,再赋值为 singletonB 没有反应
1
2
3
4
5
6
7
8
9
10
| int main()
{
Singleton *st = Singleton::getInstance("singletonA");
st->show();
Singleton *st1 = Singleton::getInstance("singletonB");
st1->show();
return 0;
}
|
这样也不行,还是只要 st 存在,就会返回 Singleton::singleton
5、原型模式
- 原型模式(Prototype
Pattern)是一种创建型设计模式,它允许通过复制现有对象来创建新的对象,而无需知道对象的具体实现细节。在原型模式中,我们可以将现有对象作为原型,然后通过复制该原型来创建新的对象。
- 使用原型模式的一个显著优点是可以避免重复创建相似的对象,从而提高程序的性能和效率。另外,原型模式也可以用来隐藏对象创建的细节,从而使代码更加简洁和易于维护。
- 在实现原型模式时,通常需要在原型类中定义一个
clone()方法,用于创建并返回一个新的对象实例。clone()方法通常会先创建一个与原型对象相同类型的新对象,然后将原型对象的状态复制到新对象中,最后返回新对象。在
C++中,我们可以使用拷贝构造函数或赋值运算符来实现对象的复制。
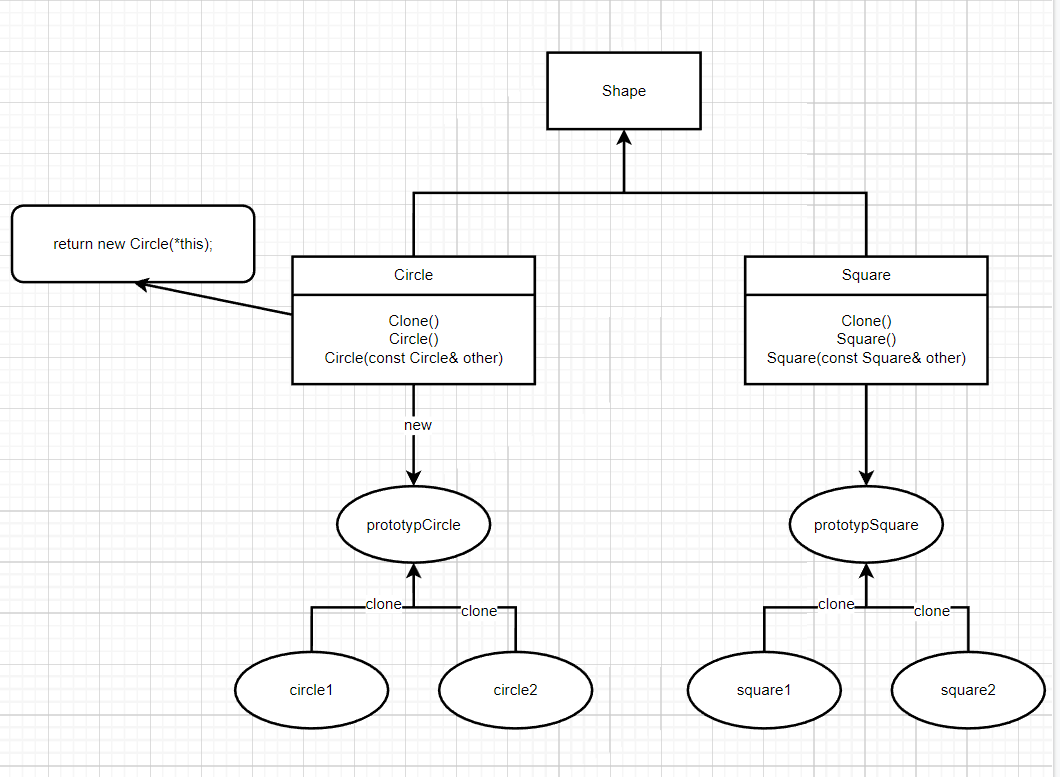 原型模式
原型模式
代码示例
1
2
3
4
5
6
7
8
9
10
11
12
13
14
15
16
17
18
19
20
21
22
23
24
25
26
27
28
29
30
31
32
| class Shape {
public:
virtual Shape* clone() = 0;
virtual void draw() = 0;
};
class Circle : public Shape {
public:
Circle() {}
Circle(const Circle& other) {}
virtual Shape* clone() {
return new Circle(*this);
}
virtual void draw() {
std::cout << "Drawing a circle.\n";
}
};
class Square : public Shape {
public:
Square() {}
Square(const Square& other) {}
virtual Shape* clone() {
return new Square(*this);
}
virtual void draw() {
std::cout << "Drawing a square.\n";
}
};
|
return new Circle(*this);
// return new Circle(*this) 的作用是创建一个新的 Circle
对象,并返回该对象的指针,从而实现了原型模式的复制功能
// *this 指的是当前的 Circle 对象
// new Circle(*this)会调用拷贝构造函数
测试
1
2
3
4
5
6
7
8
9
10
11
12
13
14
15
|
int main()
{
  Circle* prototypeCircle = new Circle();
  Square* prototypeSquare = new Square();

  Shape* circle1 = prototypeCircle->clone();
  Shape* circle2 = prototypeCircle->clone();
  circle1->draw();
  circle2->draw();
  Shape* square1 = prototypeSquare->clone();
  square1->draw();

  return 0;
}
|
6、建造者模式
建造者模式(Builder
Pattern)是一种创建型设计模式,它允许你使用相同的构建过程来创建不同的表示形式。
建造者模式的主要目的是将一个复杂对象的构建过程分离出来,使其可以独立于主要的业务逻辑而变化。通过使用建造者模式,我们可以更加灵活地创建复杂的对象,而不需要关心其具体的构建过程。
建造者模式通常由以下几个角色组成:
- Director(指挥者):负责调用建造者来构建产品,并控制建造的流程。
- Builder(建造者):负责定义产品的构建过程,以及如何组装各个部件。
- Concrete Builder(具体建造者):负责实现 Builder
接口,以定义产品的各个部件的具体构建方式。
- Product(产品):要创建的复杂对象,通常由多个部件组成。
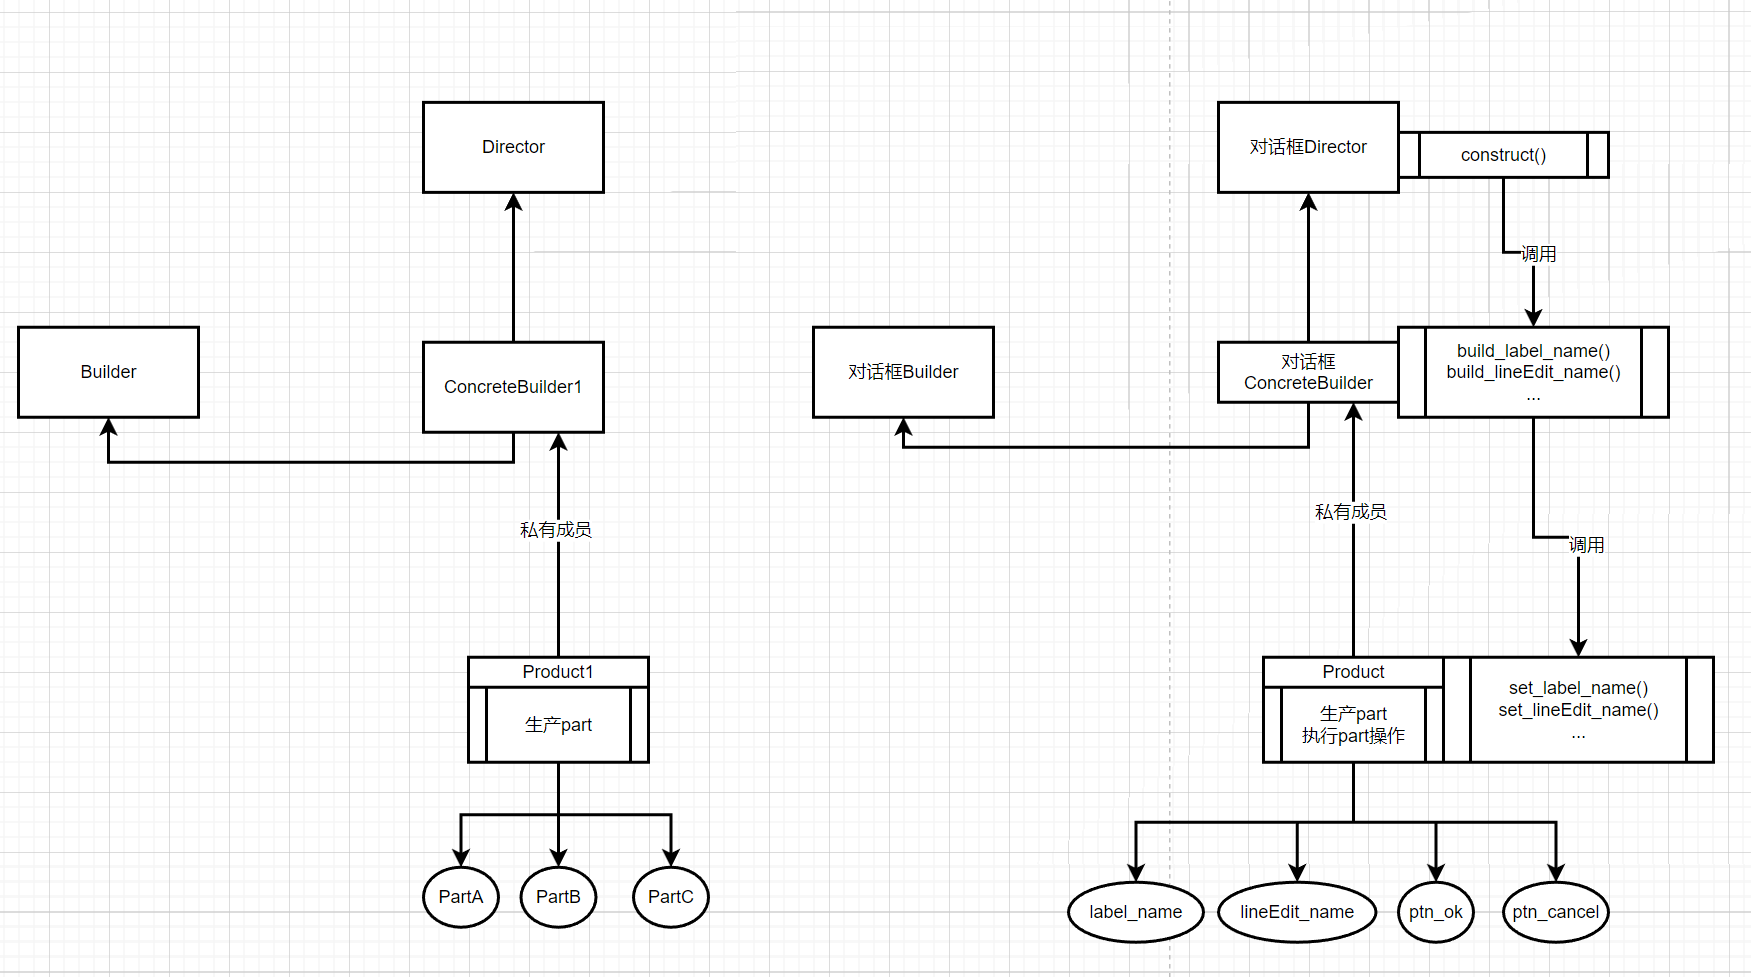 建造者模式
建造者模式
1
2
3
4
5
6
7
8
9
10
11
12
13
14
15
16
17
18
19
20
21
22
23
24
25
26
27
28
29
30
31
32
33
34
35
36
37
38
39
40
41
42
43
44
45
46
47
48
49
50
51
52
53
54
55
56
57
58
59
60
61
62
63
64
65
66
67
68
69
70
71
72
73
74
75
76
77
78
79
80
81
82
83
|
#include <iostream>
using namespace std;
class Product {
public:
void set_part_a(const std::string& part_a) {
part_a_ = part_a;
}
void set_part_b(const std::string& part_b) {
part_b_ = part_b;
}
void set_part_c(const std::string& part_c) {
part_c_ = part_c;
}
void print_parts() const {
std::cout << "Part A: " << part_a_ << "\n";
std::cout << "Part B: " << part_b_ << "\n";
std::cout << "Part C: " << part_c_ << "\n";
}
private:
std::string part_a_;
std::string part_b_;
std::string part_c_;
};
class Builder {
public:
virtual void build_part_a() = 0;
virtual void build_part_b() = 0;
virtual void build_part_c() = 0;
virtual Product* get_product() = 0;
};
class ConcreteBuilder : public Builder {
public:
ConcreteBuilder() : product_(new Product()) {}
virtual void build_part_a() {
product_->set_part_a("Part A");
}
virtual void build_part_b() {
product_->set_part_b("Part B");
}
virtual void build_part_c() {
product_->set_part_c("Part C");
}
virtual Product* get_product() {
return product_;
}
private:
Product* product_;
};
class Director {
public:
Director(Builder* builder) : builder_(builder) {}
void construct() {
builder_->build_part_a();
builder_->build_part_b();
builder_->build_part_c();
}
private:
Builder* builder_;
};
int main() {
ConcreteBuilder builder1;
Director director(&builder1);
director.construct();
Product* product = builder1.get_product();
product->print_parts();
delete product;
return 0;
}
|
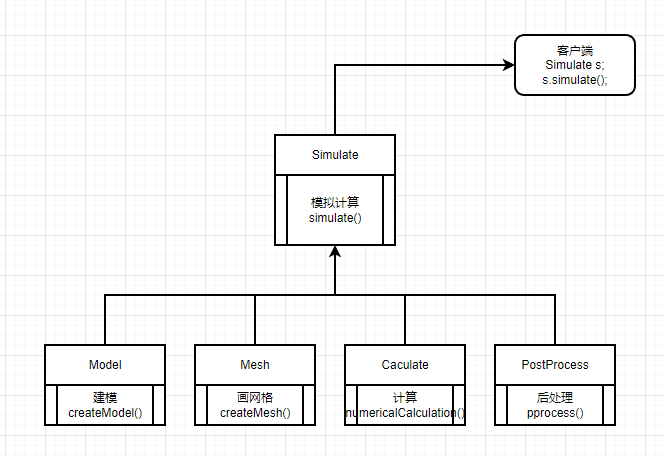
7、外观模式
C++外观模式是一种设计模式,它提供了一个简单的接口,用于访问复杂系统的子系统。外观模式隐藏了系统的复杂性,并为客户端提供了一个简单的接口,以便于使用系统。
在
C++中,外观模式通常涉及到一个外观类,该类封装了子系统的复杂性,并提供了一个简单的接口,用于访问子系统的功能。客户端只需要与外观类交互,并不需要了解子系统的工作原理。
下面以数值迷你过程举例,数值模拟一般包括建模、划分网格、计算和后处理
4 部分。
 外观模式
外观模式
示例代码如下
1
2
3
4
5
6
7
8
9
10
11
12
13
14
15
16
17
18
19
20
21
22
23
24
25
26
27
28
29
30
31
32
33
34
35
36
37
38
39
40
41
42
43
44
45
46
47
48
49
50
51
52
53
54
55
56
57
58
59
60
|
#include <iostream>
using namespace std;
class Model{
public:
void createModel(){
cout << "建模" << endl;
}
};
class Mesh{
public:
void createMesh(){
cout << "划分网格" << endl;
}
};
class Caculate{
public:
void numericalCalculation(){
cout << "数值计算" << endl;
}
};
class PostProcess{
public:
void pprocess(){
cout << "后处理" << endl;
}
};
class Simulation{
public:
Simulation():model_(new Model()),mesh_(new Mesh()),cal_(new Caculate()),post_(new PostProcess()){};
void simulate(){
model_->createModel();
mesh_->createMesh();
cal_->numericalCalculation();
post_->pprocess();
}
private:
Model *model_;
Mesh *mesh_;
Caculate *cal_;
PostProcess *post_;
};
int main()
{
Simulation s;
s.simulate();
return 0;
}
|
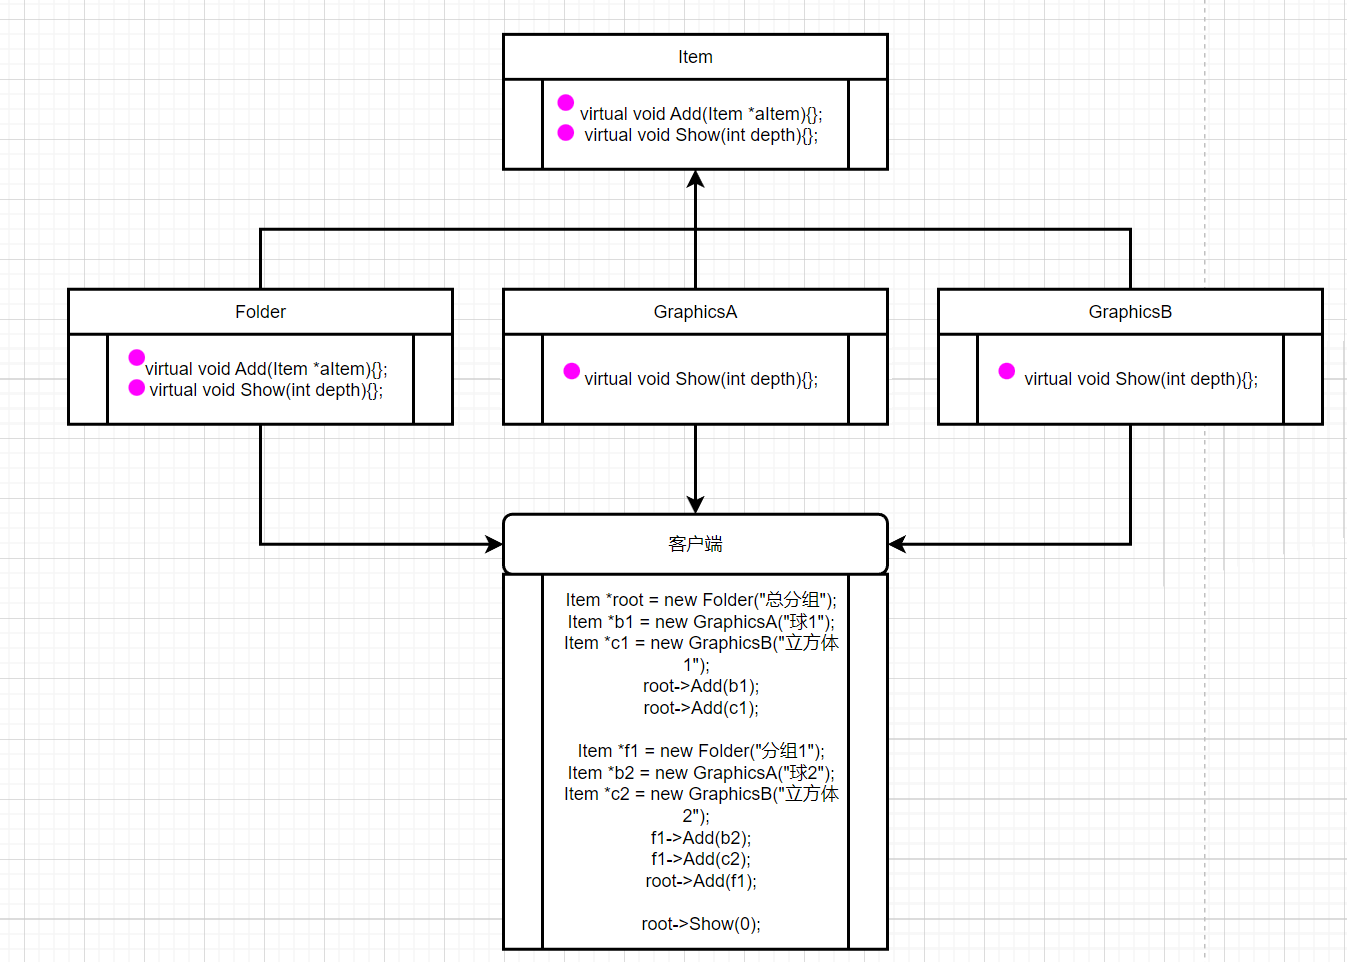
8、组合模式
C++组合模式是一种设计模式,它允许我们将对象组成树形结构,以表示“整体/部分”层次结构。组合模式使我们能够以一致的方式处理单个对象和对象的组合。
在
C++中,组合模式通常涉及到一个组件类,该类定义了表示“整体/部分”层次结构的所有对象的通用接口。组件类可以是抽象的,也可以是具体的。
组件类可以有子类,这些子类可以是叶子节点,也可以是组合节点。叶子节点表示树中的单个对象,而组合节点表示树中的对象组合。组合节点可以包含一个或多个子节点,这些子节点可以是叶子节点,也可以是组合节点。
 组合模式
组合模式
1
2
3
4
5
6
7
8
9
10
11
12
13
14
15
16
17
18
19
20
21
22
23
24
25
26
27
28
29
30
31
32
33
34
35
36
37
38
39
40
41
42
43
44
45
46
47
48
49
50
51
52
53
54
55
56
57
58
59
60
61
62
63
64
65
66
67
68
69
70
71
72
73
74
75
76
77
78
79
80
81
82
83
84
85
86
87
88
89
90
91
92
93
94
95
96
97
98
99
100
101
102
103
104
105
|
#include <iostream>
#include <list>
using namespace std;
class Item
{
public:
Item(string name) : name_(name){};
virtual ~Item(){};
virtual void Add(Item *aItem){};
virtual void Show(int depth){};
protected:
string name_;
};
class Folder : public Item
{
public:
Folder(string name) : Item(name){};
~Folder() override{};
void Add(Item *aItem)
{
item_list_.push_back(aItem);
};
void Show(int depth)
{
for (int i = 0; i < depth; i++)
{
cout << "-";
}
cout << name_ << endl;
list<Item *>::iterator iter = item_list_.begin();
for (; iter != item_list_.end(); iter++)
{
(*iter)->Show(depth + 2);
}
}
private:
list<Item *> item_list_;
};
class GraphicsA : public Item
{
public:
GraphicsA(string name) : Item(name){};
~GraphicsA() override{};
void Show(int depth)
{
for (int i = 0; i < depth; i++)
{
cout << "-";
}
cout << name_ << endl;
}
};
class GraphicsB : public Item
{
public:
GraphicsB(string name) : Item(name){};
~GraphicsB() override{};
void Show(int depth)
{
for (int i = 0; i < depth; i++)
{
cout << "-";
}
cout << name_ << endl;
}
};
int main()
{
Item *root = new Folder("总分组");
Item *b1 = new GraphicsA("球1");
Item *c1 = new GraphicsB("立方体1");
root->Add(b1);
root->Add(c1);
Item *f1 = new Folder("分组1");
Item *b2 = new GraphicsA("球2");
Item *c2 = new GraphicsB("立方体2");
f1->Add(b2);
f1->Add(c2);
root->Add(f1);
root->Show(0);
delete root;
delete b1;
delete c1;
delete f1;
delete b2;
delete c2;
return 0;
}
|
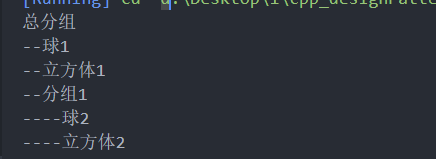
输出
 组合模式
组合模式
注意这里的 show 函数传入了一个深度,深度递增+2.root 调用时 show
传入的为 0,b1、c1 和 f1 传入时 show 调用的是 2,b2 和 c2 调用时传入的是
4.
上面的实现方式有缺点,就是内存的释放不好,需要客户自己动手,非常不方便。有待改进,比较好的做法是让
Folder 类来释放。因为所有的指针都是存在 Folder 类的链表中。
9、代理模式
允许我们提供一个代理对象来控制对另一个对象的访问。代理模式使我们能够在不改变原始对象的情况下,增强其功能或控制其访问。
在
C++中,代理模式通常涉及到一个代理类和一个原始类。代理类实现了与原始类相同的接口,并在其内部维护一个对原始对象的引用。代理类可以拦截对原始对象的访问,并根据需要将其转发给原始对象。
主要分为(1)远程代理,(2)虚代理,(3)保护代理,(4)智能引用。本文主要介绍虚代理和智能引用两种情况。
9.1 虚代理
 代理模式
代理模式
1
2
3
4
5
6
7
8
9
10
11
12
13
14
15
16
17
18
19
20
21
22
23
24
25
26
27
28
29
30
31
32
33
34
35
36
37
38
39
40
41
42
43
44
45
46
47
48
49
50
51
52
|
#include <iostream>
using namespace std;
class Image
{
public:
Image(string name): imageName_(name) {}
virtual ~Image() {}
virtual void Show() {}
protected:
string imageName_;
};
class BigImage: public Image
{
public:
BigImage(string name):Image(name) {}
~BigImage() {}
void Show() { cout<<"Show big image : "<<imageName_<<endl; }
};
class BigImageProxy: public Image
{
private:
BigImage *bigImage_;
public:
BigImageProxy(string name):Image(name),bigImage_(nullptr) {}
~BigImageProxy() { delete bigImage_; }
void Show()
{
if(bigImage_ == nullptr)
bigImage_ = new BigImage(imageName_);
bigImage_->Show();
}
};
int main() {
Image *image = new BigImageProxy("proxy.jpg");
image->Show();
delete image;
return 0;
}
|
9.2 引用代理
手写一个 auto_ptr
1
2
3
4
5
6
7
8
9
10
11
12
13
14
15
16
17
18
19
20
21
22
23
24
25
26
27
28
29
30
31
32
33
34
35
36
37
38
39
40
41
42
43
44
45
46
47
48
49
| #include <iostream>
using namespace std;
template <typename T>
class auto_ptr
{
public:
explicit auto_ptr(T *p = nullptr) : pointee(p){};
auto_ptr(auto_ptr<T> &rhs) : pointee(rhs.release()){};
~auto_ptr() { delete pointee; };
auto_ptr<T> &operator=(auto_ptr &rhs)
{
if (this != &rhs)
reset(rhs.release());
return *this;
}
T &operator*() const { return *pointee; };
T &operator->() const { return pointee; };
T *get() const { return pointee; };
T *release()
{
T *oldPointee = pointee;
pointee = nullptr;
return oldPointee;
}
void reset(T *p = nullptr)
{
if (pointee != p)
{
delete pointee;
pointee = p;
}
}
private:
T *pointee;
};
int main()
{
auto_ptr<int> p1(new int(42));
auto_ptr<int> p2 = p1;
cout << *p2 <<endl;
auto p3 = new int(50);
p2.reset(p3);
cout << *p2 <<endl;
return 0;
}
|
10、享元模式
- C++中的享元模式是一种结构型设计模式,它旨在通过共享对象来最小化内存使用和对象创建的开销。
- 在享元模式中,对象的状态被分为内部状态和外部状态,其中内部状态是对象的固有属性,而外部状态则是在运行时由客户端传递给对象的信息。
- 在 C++中,实现享元模式需要定义一个享元工厂类和一个享元类。
- 享元工厂类负责创建和管理享元对象,而享元类则负责存储和处理对象的内部状态和外部状态。
比如:在设计一款游戏时,里面有很多的怪物,这些怪物虽然分为不同的类别,但每种都有自己的血条、攻击力和防御力。
- 定义一个 map,用于存储哥布林、兽人和龙;
- 创建哥布林对象,如果已经存在哥布林对象,返回已存在的哥布林的引用,否则新建哥布林对象;
- 可以验证 g1 和 g2 是同一个对象的引用。
1
2
3
4
5
6
7
8
9
10
11
12
13
14
15
16
17
18
19
20
21
22
23
24
25
26
27
28
29
30
31
32
33
34
35
36
37
38
39
40
41
42
43
44
45
46
47
48
49
50
51
52
53
54
55
56
57
58
59
60
61
62
63
64
65
66
67
68
69
70
71
72
73
74
75
76
77
|
#include <iostream>
#include <map>
using namespace std;
class Monster
{
public:
Monster(int hp, int atk, int def) : hp_(hp), atk_(atk), def_(def){};
void stack()
{
}
private:
int hp_;
int atk_;
int def_;
};
class MonsterFactory
{
public:
Monster *getMonster(const std::string &name)
{
auto it = monsterMap_.find(name);
if (it != monsterMap_.end())
{
return it->second;
}
Monster *monster = createMonster(name);
monsterMap_[name] = monster;
return monster;
}
private:
std::map<std::string, Monster *> monsterMap_;
Monster *createMonster(const std::string &name)
{
if (name == "Goblin")
{
return new Monster(50, 10, 5);
}
else if (name == "Orc")
{
return new Monster(100, 20, 10);
}
else
{
return new Monster(200, 30, 20);
}
}
};
int main()
{
MonsterFactory monsterFactory;
Monster *g1 = monsterFactory.getMonster("Goblin");
Monster *g2 = monsterFactory.getMonster("Goblin");
Monster *o1 = monsterFactory.getMonster("Orc");
Monster *o2 = monsterFactory.getMonster("Orc");
Monster *d1 = monsterFactory.getMonster("Dragon");
Monster *d2 = monsterFactory.getMonster("Dragon");
cout << (g1 == g2) << endl;
cout << (o1 == o2) << endl;
cout << (d1 == d2) << endl;
cout << g1->second << endl;
return 0;
}
|
绘制棋盘案例
- 虽然棋盘上有很多的棋子,但他们不是白色都是黑色,每种颜色的属性都一致,只是位置不同。我们将位置单独存放。
- 创建白色棋子时,如果已经存在一个对象,就直接向容器中添加位置;如果不存在,则需要先创建,再添加位置;
- 这样所有的白色只享一个对象,极大地节约内存空间。
1
2
3
4
5
6
7
8
9
10
11
12
13
14
15
16
17
18
19
20
21
22
23
24
25
26
27
28
29
30
31
32
33
34
35
36
37
38
39
40
41
42
43
44
45
46
47
48
49
50
51
52
53
54
55
56
57
58
59
60
61
62
63
64
65
66
67
68
69
70
71
72
73
74
75
76
77
78
79
80
81
82
| #include <iostream>
#include <vector>
using namespace std;
enum PieceColor {BLACK, WHITE};
struct PiecePos
{
int x;
int y;
PiecePos(int a, int b): x(a), y(b) {}
};
class Piece
{
protected:
PieceColor m_color;
public:
Piece(PieceColor color): m_color(color) {}
~Piece() {}
virtual void Draw() {}
};
class BlackPiece: public Piece
{
public:
BlackPiece(PieceColor color): Piece(color) {}
~BlackPiece() {}
void Draw() { cout<<"绘制一颗黑棋\n"; }
};
class WhitePiece: public Piece
{
public:
WhitePiece(PieceColor color): Piece(color) {}
~WhitePiece() {}
void Draw() { cout<<"绘制一颗白棋\n";}
};
class PieceBoard
{
private:
vector<PiecePos> m_vecPos;
Piece *m_blackPiece;
Piece *m_whitePiece;
string m_blackName;
string m_whiteName;
public:
PieceBoard(string black, string white): m_blackName(black), m_whiteName(white)
{
m_blackPiece = null;
m_whitePiece = NULL;
}
~PieceBoard() { delete m_blackPiece; delete m_whitePiece;}
void SetPiece(PieceColor color, PiecePos pos)
{
if(color == BLACK)
{
if(m_blackPiece == NULL)
m_blackPiece = new BlackPiece(color);
cout<<m_blackName<<"在位置("<<pos.x<<','<<pos.y<<")";
m_blackPiece->Draw();
}
else
{
if(m_whitePiece == NULL)
m_whitePiece = new WhitePiece(color);
cout<<m_whiteName<<"在位置("<<pos.x<<','<<pos.y<<")";
m_whitePiece->Draw();
}
m_vecPos.push_back(pos);
}
};
int main()
{
PieceBoard pieceBoard("A","B");
pieceBoard.SetPiece(BLACK, PiecePos(4, 4));
pieceBoard.SetPiece(WHITE, PiecePos(4, 16));
pieceBoard.SetPiece(BLACK, PiecePos(16, 4));
pieceBoard.SetPiece(WHITE, PiecePos(16, 16));
}
|
11、桥接模式
C++中的桥接模式是一种结构型设计模式,它旨在将抽象部分与实现部分分离开来,从而使它们可以独立地变化。在桥接模式中,抽象部分和实现部分通过一个桥接接口进行连接,从而实现解耦和灵活性。
在
C++中,实现桥接模式需要定义一个-抽象基类和一个实现基类,其中抽象基类定义了抽象部分的接口,而实现基类定义了实现部分的接口。然后,我们通过继承和组合来实现不同的抽象部分和实现部分的组合。
举一个操作系统的例子:
1
2
3
4
5
6
7
8
9
10
11
12
13
14
15
16
17
18
19
20
21
22
23
24
25
26
27
28
29
30
31
32
33
34
35
36
37
38
39
40
41
42
43
44
45
46
47
48
49
50
51
52
53
54
55
56
| #include <iostream>
using namespace std;
class OS
{
public:
virtual void InstallOS_Imp() {}
};
class WindowOS: public OS
{
public:
void InstallOS_Imp() { cout<<"安装Window操作系统"<<endl; }
};
class LinuxOS: public OS
{
public:
void InstallOS_Imp() { cout<<"安装Linux操作系统"<<endl; }
};
class UnixOS: public OS
{
public:
void InstallOS_Imp() { cout<<"安装Unix操作系统"<<endl; }
};
class Computer
{
public:
virtual void InstallOS(OS *os) {}
};
class DellComputer: public Computer
{
public:
void InstallOS(OS *os) { os->InstallOS_Imp(); }
};
class AppleComputer: public Computer
{
public:
void InstallOS(OS *os) { os->InstallOS_Imp(); }
};
class HPComputer: public Computer
{
public:
void InstallOS(OS *os) { os->InstallOS_Imp(); }
};
int main()
{
OS *os1 = new WindowOS();
OS *os2 = new LinuxOS();
Computer *computer1 = new AppleComputer();
computer1->InstallOS(os1);
computer1->InstallOS(os2);
}
|
绘制图形
1
2
3
4
5
6
7
8
9
10
11
12
13
14
15
16
17
18
19
20
21
22
23
24
25
26
27
28
29
30
31
32
33
34
35
36
37
38
39
40
41
42
43
44
45
46
47
48
49
50
51
52
53
54
55
56
57
58
59
60
61
62
63
64
65
66
67
68
69
70
71
72
73
74
75
76
77
78
79
80
81
82
83
84
85
86
87
88
89
90
91
92
93
94
95
96
97
98
99
100
101
102
103
104
105
106
107
108
109
|
#include <iostream>
using namespace std;
class Shape
{
public:
virtual void draw() = 0;
};
class Circle : public Shape
{
public:
Circle(double x, double y, double radius, DrawingAPI *drawingAPI)
: m_x(x), m_y(y), m_radius(radius), m_drawingAPI(drawingAPI) {}
void draw() override
{
m_drawingAPI->drawCircle(m_x, m_y, m_radius);
}
private:
double m_x;
double m_y;
double m_radius;
DrawingAPI *m_drawingAPI;
};
class Rectangle : public Shape
{
public:
Rectangle(double x1, double y1, double x2, double y2, DrawingAPI *drawingAPI)
: m_x1(x1), m_y1(y1), m_x2(x2), m_y2(y2), m_drawingAPI(drawingAPI) {}
void draw() override
{
m_drawingAPI->drawRectangle(m_x1, m_y1, m_x2, m_y2);
}
private:
double m_x1;
double m_y1;
double m_x2;
double m_y2;
DrawingAPI *m_drawingAPI;
};
class DrawingAPI
{
public:
virtual void drawCircle(double x, double y, double radius) = 0;
virtual void drawRectangle(double x1, double y1, double x2, double y2) = 0;
};
class DrawingAPI1 : public DrawingAPI
{
public:
void drawCircle(double x, double y, double radius) override
{
cout << "API1.circle at " << x << ',' << y << ' ' << radius << endl;
}
void drawRectangle(double x1, double y1, double x2, double y2) override
{
cout << "API1.rectangle at " << x1 << ',' << y1 << " to " << x2 << ',' << y2 << endl;
}
};
class DrawingAPI2 : public DrawingAPI
{
public:
void drawCircle(double x, double y, double radius) override
{
cout << "API2.circle at " << x << ',' << y << ' ' << radius << endl;
}
void drawRectangle(double x1, double y1, double x2, double y2) override
{
cout << "API2.rectangle at " << x1 << ',' << y1 << " to " << x2 << ',' << y2 << endl;
}
};
int main()
{
DrawingAPI1 api1;
DrawingAPI2 api2;
Circle circle1(1, 2, 3, &api1);
Rectangle rectangle1(0, 0, 1, 1, &api1);
Circle circle2(4, 5, 6, &api2);
Rectangle rectangle2(2, 2, 3, 3, &api2);
circle1.draw();
rectangle1.draw();
circle2.draw();
rectangle2.draw();
return 0;
}
|
12、装饰模式
C++中的装饰器模式(Decorator
Pattern)是一种结构型设计模式,它允许你在不改变对象自身的基础上,动态地给一个对象添加额外的职责。装饰器模式以对客户端透明的方式扩展对象的功能。
装饰器模式的核心思想是:将对象嵌套在一系列装饰器中,每个装饰器都为对象增加一些功能。装饰器和被装饰的对象都实现相同的接口,这样装饰器就可以完全替代被装饰的对象。
比如有一个手机,允许你为手机添加特性,比如增加挂件、屏幕贴膜等。一种灵活的设计方式是,将手机嵌入到另一对象中,由这个对象完成特性的添加,我们称这个嵌入的对象为装饰。这个装饰与它所装饰的组件接口一致,因此它对使用该组件的客户透明。
 装饰模式
装饰模式
代码演示
1
2
3
4
5
6
7
8
9
10
11
12
13
14
15
16
17
18
19
20
21
22
23
24
25
26
27
28
29
30
31
32
33
34
35
36
37
38
39
40
41
42
43
44
45
46
47
48
49
50
51
52
53
54
55
56
57
58
59
60
61
62
63
64
65
66
67
68
69
70
71
72
73
74
75
76
77
78
79
80
81
| #include <iostream>
using namespace std;
class Phone
{
public:
Phone(){};
virtual ~Phone(){};
virtual void ShowDecorate(){};
};
class iPhone : public Phone
{
private:
string m_name;
public:
iPhone(string name) : m_name(name){};
~iPhone(){};
void ShowDecorate() override { cout << m_name << "的装饰:"; }
};
class NokiiaPhone : public Phone
{
private:
string m_name;
public:
NokiiaPhone(string name) : m_name(name){};
~NokiiaPhone(){};
void ShowDecorate() override { cout << m_name << "的装饰:"; }
};
class DecoratorPhone : public Phone
{
private:
Phone *m_phone;
public:
DecoratorPhone(Phone *phone) : m_phone(phone){};
~DecoratorPhone(){};
virtual void ShowDecorate() { m_phone->ShowDecorate(); };
};
class DecoratorPhoneA : public DecoratorPhone
{
public:
DecoratorPhoneA(Phone *phone) : DecoratorPhone(phone){};
void ShowDecorate()
{
DecoratorPhone::ShowDecorate();
AddDecorate();
}
private:
void AddDecorate()
{
cout << "增加挂件" << endl;
}
};
class DecoratorPhoneB : public DecoratorPhone
{
public:
DecoratorPhoneB(Phone *phone) : DecoratorPhone(phone){};
void ShowDecorate()
{
DecoratorPhone::ShowDecorate();
AddDecorate();
}
private:
void AddDecorate()
{
cout << "屏幕贴膜" << endl;
}
};
|
测试
1
2
3
4
5
6
7
8
9
10
11
| int main()
{
Phone *iphone = new NokiiaPhone("6300");
Phone *dpa = new DecoratorPhoneA(iphone);
Phone *dpb = new DecoratorPhoneB(iphone);
dpb->ShowDecorate();
delete dpa;
delete dpb;
delete iphone;
return 0;
}
|
输出
6300 的装饰:屏幕贴膜
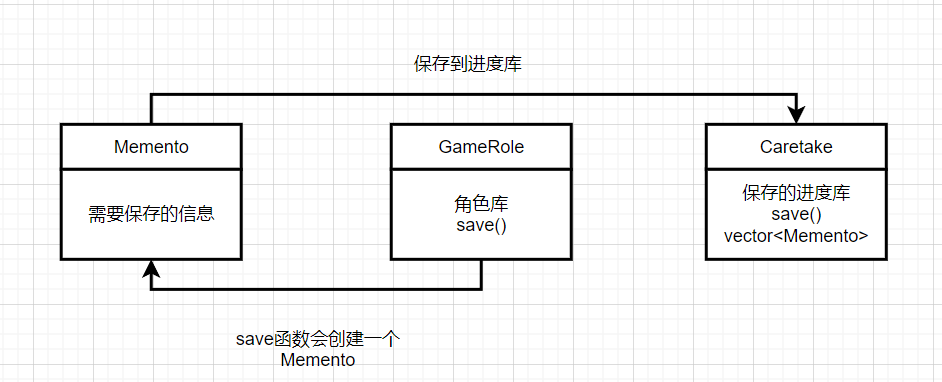
13、备忘录模式
备忘录模式是一种行为型设计模式,用于在不破坏封装性的前提下,捕获和恢复对象的内部状态。该模式常常被用于需要在某个时刻保存对象的状态,并在以后的某个时刻恢复该状态的情形。备忘录模式的核心是定义了一个备忘录对象,用于存储当前对象的状态,以便在需要恢复状态时使用。
在 C++ 中,实现备忘录模式通常需要定义三个角色:
- 原始对象是需要保存状态的对象;
- 备忘录对象负责存储原始对象的状态;
- 管理者对象则负责管理备忘录对象,通常包括存储备忘录对象、撤销操作等功能。
这样以后就可将该对象恢复到原先保存的状态。举个简单的例子,我们玩游戏时都会保存进度,所保存的进度以文件的形式存在。这样下次就可以继续玩,而不用从头开始。这里的进度其实就是游戏的内部状态,而这里的文件相当于是在游戏之外保存状态。这样,下次就可以从文件中读入保存的进度,从而恢复到原来的状态。这就是备忘录模式。
 备忘录
备忘录
代码演示
1
2
3
4
5
6
7
8
9
10
11
12
13
14
15
16
17
18
19
20
21
22
23
24
25
26
27
28
29
30
31
32
33
34
35
36
37
38
39
40
41
42
43
44
45
46
47
48
49
50
51
|
class Memento
{
public:
int m_vitality;
int m_attack;
int m_defense;
public:
Memento(int vitality, int attack, int defense):
m_vitality(vitality),m_attack(attack),m_defense(defense){}
Memento& operator=(const Memento &memento)
{
m_vitality = memento.m_vitality;
m_attack = memento.m_attack;
m_defense = memento.m_defense;
return *this;
}
};
class GameRole
{
private:
int m_vitality;
int m_attack;
int m_defense;
public:
GameRole(): m_vitality(100),m_attack(100),m_defense(100) {}
Memento Save()
{
Memento memento(m_vitality, m_attack, m_defense);
return memento;
}
void Load(Memento memento)
{
m_vitality = memento.m_vitality;
m_attack = memento.m_attack;
m_defense = memento.m_defense;
}
void Show() { cout<<"vitality : "<< m_vitality<<", attack : "<< m_attack<<", defense : "<< m_defense<<endl; }
void Attack() { m_vitality -= 10; m_attack -= 10; m_defense -= 10; }
};
class Caretake
{
public:
Caretake() {}
void Save(Memento menento) { m_vecMemento.push_back(menento); }
Memento Load(int state) { return m_vecMemento[state]; }
private:
vector<Memento> m_vecMemento;
};
|
测试
1
2
3
4
5
6
7
8
9
10
11
| int main(){
Caretake caretake;
GameRole role;
role.Show();
caretake.Save(role.Save());
role.Attack();
role.Show();
role.Load(caretake.Load(0));
role.Show();
return 0;
}
|
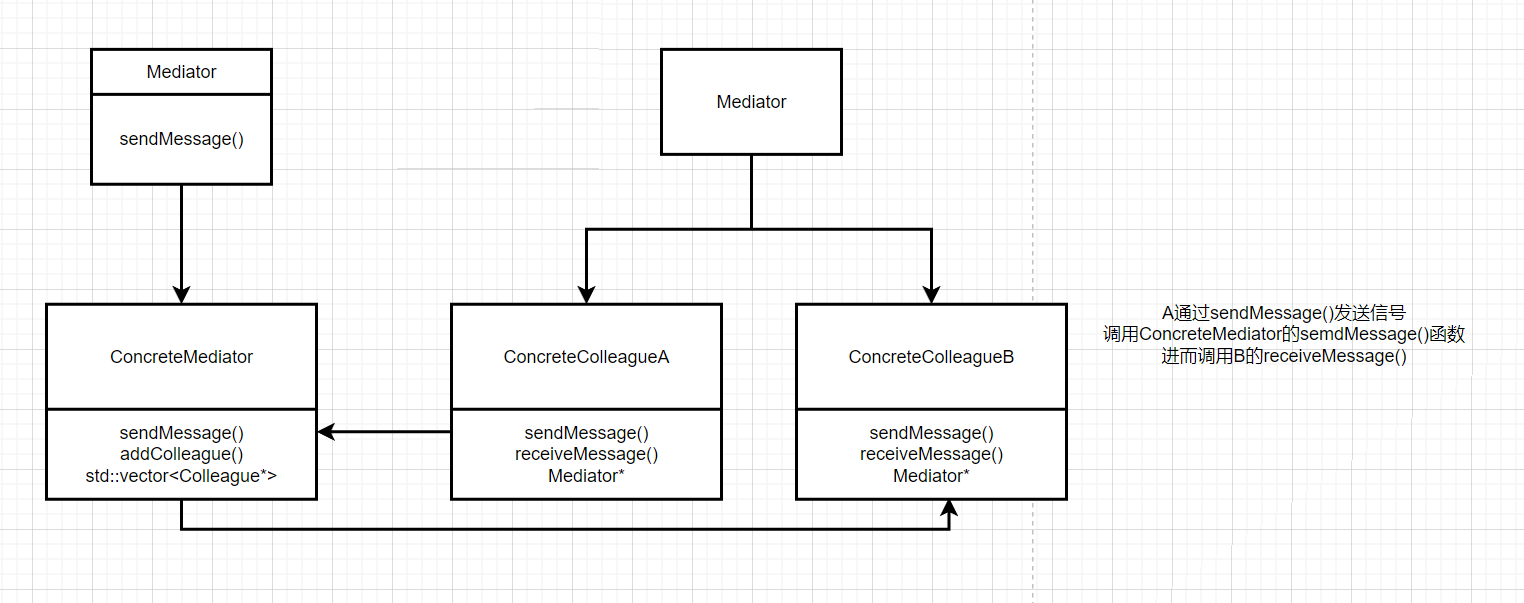
14、中介者模式
中介者模式是一种行为设计模式,它允许对象之间通过中介者进行通信,而不是直接互相通信。
用一个中介对象来封装一系列的对象交互。中介者使各对象不需要显式地相互引用,从而使其耦合松散,而且可以独立地改变它们之间的交互。
通过 A 给 B 和 C 发信息,也可以通过 B 给 A 和 C 发信息
 中介者模式
中介者模式
1
2
3
4
5
6
7
8
9
10
11
12
13
14
15
16
17
18
19
20
21
22
23
24
25
26
27
28
29
30
31
32
33
34
35
36
37
38
39
40
41
42
43
44
45
46
47
48
49
50
51
52
53
54
55
56
57
58
59
60
61
62
63
64
65
66
67
68
69
70
71
72
73
74
75
76
77
78
79
80
81
82
83
84
85
86
87
88
89
90
| #include <iostream>
#include <string>
#include <vector>
class Colleague;
class Mediator {
public:
virtual void sendMessage(const std::string& message, Colleague* colleague) = 0;
};
class Colleague {
public:
Colleague(Mediator* mediator) : m_mediator(mediator) {}
virtual void sendMessage(const std::string& message) {
m_mediator->sendMessage(message, this);
}
virtual void receiveMessage(const std::string& message) = 0;
protected:
Mediator* m_mediator;
};
class ConcreteColleagueA : public Colleague {
public:
ConcreteColleagueA(Mediator* mediator) : Colleague(mediator) {}
void receiveMessage(const std::string& message) override {
std::cout << "ConcreteColleagueA received message: " << message << std::endl;
}
};
class ConcreteColleagueB : public Colleague {
public:
ConcreteColleagueB(Mediator* mediator) : Colleague(mediator) {}
void receiveMessage(const std::string& message) override {
std::cout << "ConcreteColleagueB received message: " << message << std::endl;
}
};
class ConcreteColleagueC : public Colleague {
public:
ConcreteColleagueC(Mediator* mediator) : Colleague(mediator) {}
void receiveMessage(const std::string& message) override {
std::cout << "ConcreteColleagueC received message: " << message << std::endl;
}
};
class ConcreteMediator : public Mediator {
public:
void addColleague(Colleague* colleague) {
m_colleagues.push_back(colleague);
}
void sendMessage(const std::string& message, Colleague* sender) override {
for (auto colleague : m_colleagues) {
if (colleague != sender) {
colleague->receiveMessage(message);
}
}
}
private:
std::vector<Colleague*> m_colleagues;
};
int main() {
ConcreteMediator mediator;
ConcreteColleagueA colleagueA(&mediator);
ConcreteColleagueB colleagueB(&mediator);
ConcreteColleagueC colleagueC(&mediator);
mediator.addColleague(&colleagueA);
mediator.addColleague(&colleagueB);
mediator.addColleague(&colleagueC);
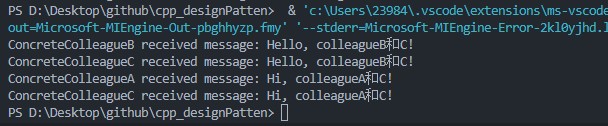
colleagueA.sendMessage("Hello, colleagueB和C!");
colleagueB.sendMessage("Hi, colleagueA和C!");
return 0;
}
|
输出
 输出
输出
房屋中介案例
1
2
3
4
5
6
7
8
9
10
11
12
13
14
15
16
17
18
19
20
21
22
23
24
25
26
27
28
29
30
31
32
33
34
35
36
37
38
39
40
41
42
43
44
45
46
47
48
49
50
51
52
53
54
55
56
57
58
59
60
61
62
63
64
65
66
67
68
69
70
71
72
| #include<iostream>
#include<vector>
using namespace std;
class Mediator;
class Person{
public:
virtual void SendMessage(string msg){};
virtual void GetMessage(string msg){};
virtual void SetMediator(Mediator* mediator){};
};
class Mediator{
public:
virtual void AddPerson(Person* person){}
virtual void SendMessage(string msg,Person* person){}
};
class MediatorA : public Mediator{
private:
vector<Person*> person_vector_;
public:
void AddPerson(Person* person){
person_vector_.push_back(person);
}
void SendMessage(string msg,Person* person){
for (auto aPerson : person_vector_){
if(aPerson != person){
aPerson->GetMessage(msg);
}
}
}
};
class PersonA : public Person{
protected:
Mediator *mediator_;
string name_;
public:
PersonA(string name):name_(name){};
void SendMessage(string msg){
mediator_->SendMessage(msg,this);
};
void GetMessage(string msg){
cout << name_ << "获得信息" << msg << endl;
};
void SetMediator(Mediator* mediator){
this->mediator_ = mediator;
};
};
int main()
{
MediatorA med1;
Person *personA = new PersonA("person1");
Person *personB = new PersonA("person2");
Person *personC = new PersonA("person3");
personA->SetMediator(&med1);
personB->SetMediator(&med1);
med1.AddPerson(personA);
med1.AddPerson(personB);
med1.AddPerson(personC);
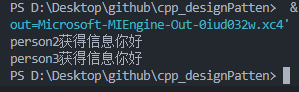
personA->SendMessage("你好");
return 0;
}
|
输出
 房产中介
房产中介
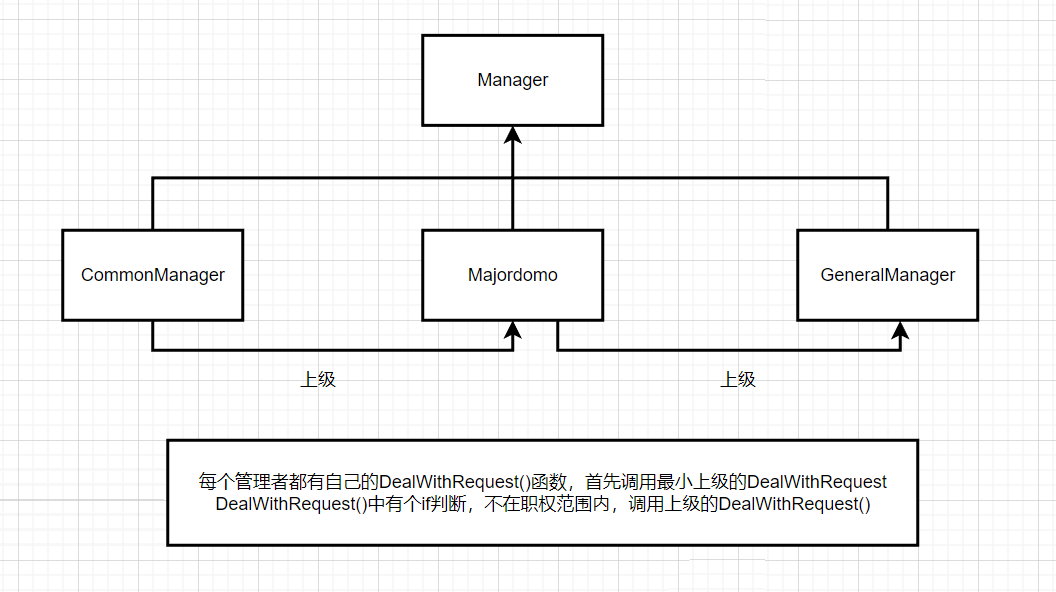
15、职责链模式
- 是一种行为设计模式,它允许你将请求沿着处理者链进行发送,直到有一个处理者能够处理该请求为止。
- 在职责链模式中,你可以为多个对象设置处理请求的机会。这些对象形成一条链,请求在链上传递,直到链上的某个对象能够处理该请求为止。通常情况下,链上的每个对象都有其自己的处理逻辑,以及对下一个处理者的引用。
- 在实现职责链模式时,你需要创建一个抽象处理者类,用于定义请求的处理方法和下一个处理者的引用。然后,你需要为每个具体的处理者创建一个子类,实现其自己的处理逻辑。最后,你需要将这些处理者组成一条链,并将请求沿着链进行传递。
- 其思想很简单,考虑员工要求加薪。公司的管理者一共有三级,总经理、总监、经理,如果一个员工要求加薪,应该向主管的经理申请,如果加薪的数量在经理的职权内,那么经理可以直接批准,否则将申请上交给总监。总监的处理方式也一样,总经理可以处理所有请求。这就是典型的职责链模式,请求的处理形成了一条链,直到有一个对象处理请求。
 职责链模式
职责链模式
1
2
3
4
5
6
7
8
9
10
11
12
13
14
15
16
17
18
19
20
21
22
23
24
25
26
27
28
29
30
31
32
33
34
35
36
37
38
39
40
41
42
43
44
45
46
47
48
49
50
51
52
53
54
55
56
57
58
59
60
61
62
63
64
65
66
67
68
69
70
71
72
73
74
| #include<iostream>
using namespace std;
class Manager
{
protected:
Manager *m_manager;
string m_name;
public:
Manager(Manager *manager, string name):m_manager(manager), m_name(name){}
virtual void DealWithRequest(string name, int num) {}
};
class CommonManager: public Manager
{
public:
CommonManager(Manager *manager, string name):Manager(manager,name) {}
void DealWithRequest(string name, int num)
{
if(num < 500)
{
cout<<"经理"<<m_name<<"批准"<<name<<"加薪"<<num<<"元"<<endl<<endl;
}
else
{
cout<<"经理"<<m_name<<"无法处理,交由总监处理"<<endl;
m_manager->DealWithRequest(name, num);
}
}
};
class Majordomo: public Manager
{
public:
Majordomo(Manager *manager, string name):Manager(manager,name) {}
void DealWithRequest(string name, int num)
{
if(num < 1000)
{
cout<<"总监"<<m_name<<"批准"<<name<<"加薪"<<num<<"元"<<endl<<endl;
}
else
{
cout<<"总监"<<m_name<<"无法处理,交由总经理处理"<<endl;
m_manager->DealWithRequest(name, num);
}
}
};
class GeneralManager: public Manager
{
public:
GeneralManager(Manager *manager, string name):Manager(manager,name) {}
void DealWithRequest(string name, int num)
{
cout<<"总经理"<<m_name<<"批准"<<name<<"加薪"<<num<<"元"<<endl<<endl;
}
};
int main()
{
Manager *general = new GeneralManager(NULL, "A");
Manager *majordomo = new Majordomo(general, "B");
Manager *common = new CommonManager(majordomo, "C");
common->DealWithRequest("D",300);
common->DealWithRequest("E", 600);
common->DealWithRequest("F", 1000);
delete common; delete majordomo; delete general;
return 0;
}
|
输出
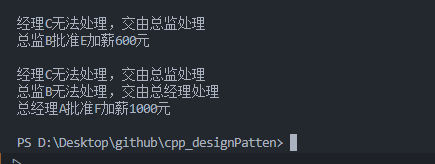 输出
输出
16、观察者模式
观察者模式(Observer
Pattern)是一种行为型设计模式,它允许多个对象同时监听另一个对象,并在该对象发生状态改变时自动通知这些监听者,从而实现对象间的松耦合。
在 C++中,观察者模式通常包含以下几个部分:
- 抽象主题(Subject):被观察者,它维护了一系列的观察者,并提供了添加、删除和通知观察者的接口。
- 具体主题(ConcreteSubject):具体的被观察者实现,它实现了抽象主题中的接口,并且维护了一个状态。
- 抽象观察者(Observer):观察者的抽象类,它定义了接收通知的接口。
- 具体观察者(ConcreteObserver):具体的观察者实现,它实现了抽象观察者中的接口,同时存储了一个指向具体主题的指针。
举个博客订阅的例子,当博主发表新文章的时候,即博主状态发生了改变,那些订阅的读者就会收到通知,然后进行相应的动作,比如去看文章,或者收藏起来。博主与读者之间存在种一对多的依赖关系。
1
2
3
4
5
6
7
8
9
10
11
12
13
14
15
16
17
18
19
20
21
22
23
24
25
26
27
28
29
30
31
32
33
34
35
36
37
38
39
40
41
42
43
44
45
46
47
48
49
50
51
52
53
54
55
56
57
58
59
60
61
62
63
64
65
66
67
68
69
70
71
72
73
74
75
76
77
78
79
80
81
82
83
84
85
86
87
88
89
90
91
92
93
94
95
96
97
98
99
100
101
102
103
104
| #include <iostream>
#include <vector>
#include <list>
using namespace std;
class Observer
{
public:
Observer() {}
virtual ~Observer() {}
virtual void Update() {}
virtual void Attach(){}
virtual void Remove(){}
};
class Blog
{
public:
Blog() {}
virtual ~Blog() {}
void Attach(Observer *observer)
{
m_observers.push_back(observer);cout << "订阅成功" <<endl;
}
void Remove(Observer *observer)
{
m_observers.remove(observer);
cout << "取消订阅" <<endl;
}
void Notify()
{
list<Observer*>::iterator iter = m_observers.begin();
for(; iter != m_observers.end(); iter++)
(*iter)->Update();
}
virtual void SetStatus(string s) { m_status = s; }
virtual string GetStatus() { return m_status; }
private:
list<Observer* > m_observers;
protected:
string m_status;
};
class BlogCSDN : public Blog
{
private:
string m_name;
public:
BlogCSDN(string name): m_name(name) {}
~BlogCSDN() {}
void SetStatus(string s) { m_status = "CSDN通知 : " + m_name + s; }
string GetStatus() { return m_status; }
};
class ObserverBlog : public Observer
{
private:
string m_name;
Blog *m_blog;
public:
ObserverBlog(string name,Blog *blog): m_name(name), m_blog(blog) {}
~ObserverBlog() {}
void Update()
{
string status = m_blog->GetStatus();
cout<<m_name<<"-------"<<status<<endl;
}
void Attach(){
m_blog->Attach(this);
}
void Remove(){
m_blog->Remove(this);
}
};
int main()
{
Blog *blog = new BlogCSDN("博客1");
Observer *observer1 = new ObserverBlog("观察者1", blog);
observer1->Attach();
blog->SetStatus("发表设计模式C++实现(15)——观察者模式");
blog->Notify();
observer1->Remove();
blog->SetStatus("发表设计模式C++实现(16)——观察者模式");
blog->Notify();
delete blog;
delete observer1;
return 0;
}
|
17、状态模式
C++中状态模式是一种行为设计模式,它允许一个对象在内部状态改变时改变它的行为,看起来似乎改变了它的类。在状态模式中,我们创建表示各种状态的对象和一个行为随着状态对象改变而改变的对象。状态模式主要解决的是在对象状态转换的时候带来的复杂性问题。通常当一个对象的行为取决于它的状态,并且它必须在运行时根据状态改变它的行为时,这时候可以考虑使用状态模式。
它有两种使用情况:
- 一个对象的行为取决于它的状态,
并且它必须在运行时刻根据状态改变它的行为。
- 一个操作中含有庞大的多分支的条件语句,且这些分支依赖于该对象的状态。
实现:Context 类包含一个当前状态对象指针 m_state,当 Context 的
Request()方法被调用时,会调用当前状态对象的
Handle()方法来处理请求。同时,Context 类还提供了一个
SetState()方法,用于切换状态对象。具体的状态对象实现了 State
类的接口,并实现了它们自己的行为。
1
2
3
4
5
6
7
8
9
10
11
12
13
14
15
16
17
18
19
20
21
22
23
24
25
26
27
28
29
30
31
32
33
34
35
36
37
38
39
40
41
42
43
44
45
46
47
48
49
50
| #include<iostream>
using namespace std;
class State {
public:
virtual void Handle() = 0;
};
class ConcreteStateA : public State {
public:
void Handle() override {
std::cout << "Handle state A." << std::endl;
}
};
class ConcreteStateB : public State {
public:
void Handle() override {
std::cout << "Handle state B." << std::endl;
}
};
class Context {
public:
void SetState(State* state) {
m_state = state;
}
void Request() {
m_state->Handle();
}
private:
State* m_state;
};
int main(){
ConcreteStateA stateA;
ConcreteStateB stateB;
Context context;
context.SetState(&stateA);
context.Request();
context.SetState(&stateB);
context.Request();
}
|
通过使用状态模式,我们可以避免在对象状态转换时引入大量的条件分支和复杂的
if-else
语句,使代码更加简洁和易于维护。当一个对象的行为取决于它的状态,并且它必须在运行时根据状态改变它的行为时,就可以考虑使用状态模式了。
战争案例
1
2
3
4
5
6
7
8
9
10
11
12
13
14
15
16
17
18
19
20
21
22
23
24
25
26
27
28
29
30
31
32
33
34
35
36
37
38
39
40
41
42
43
44
45
46
47
48
49
50
51
52
53
54
55
56
57
58
59
60
61
62
63
64
65
66
67
68
69
70
71
72
73
74
75
76
77
78
79
80
81
82
83
84
85
86
87
88
89
90
91
92
93
94
95
96
97
98
99
| #include<iostream>
using namespace std;
class War;
class State
{
public:
virtual void Prophase() {}
virtual void Metaphase() {}
virtual void Anaphase() {}
virtual void End() {}
virtual void CurrentState(War *war) {}
};
class War
{
private:
State *m_state;
int m_days;
public:
War(State *state): m_state(state), m_days(0) {}
~War() { delete m_state; }
int GetDays() { return m_days; }
void SetDays(int days) { m_days = days; }
void SetState(State *state) { delete m_state; m_state = state; }
void GetState() { m_state->CurrentState(this); }
};
class EndState: public State
{
public:
void End(War *war)
{
cout<<"战争结束"<<endl;
}
void CurrentState(War *war) { End(war); }
};
class AnaphaseState: public State
{
public:
void Anaphase(War *war)
{
if(war->GetDays() < 30)
cout<<"第"<<war->GetDays()<<"天:战争后期,双方拼死一搏"<<endl;
else
{
war->SetState(new EndState());
war->GetState();
}
}
void CurrentState(War *war) { Anaphase(war); }
};
class MetaphaseState: public State
{
public:
void Metaphase(War *war)
{
if(war->GetDays() < 20)
cout<<"第"<<war->GetDays()<<"天:战争中期,进入相持阶段,双发各有损耗"<<endl;
else
{
war->SetState(new AnaphaseState());
war->GetState();
}
}
void CurrentState(War *war) { Metaphase(war); }
};
class ProphaseState: public State
{
public:
void Prophase(War *war)
{
if(war->GetDays() < 10)
cout<<"第"<<war->GetDays()<<"天:战争初期,双方你来我往,互相试探对方"<<endl;
else
{
war->SetState(new MetaphaseState());
war->GetState();
}
}
void CurrentState(War *war) { Prophase(war); }
};
int main()
{
War *war = new War(new ProphaseState());
for(int i = 1; i < 40;i += 5)
{
war->SetDays(i);
war->GetState();
}
delete war;
return 0;
}
|
参考链接:
- 图说设计模式
- 知乎:快速记忆 23
种设计模式
