基本配置
github
学习视频地址
环境配置
在 anaconda
中新建虚拟环境conda create -n Pytorch python=3.9
激活虚拟环境并安装 numpy、matplotlib、pandas 库
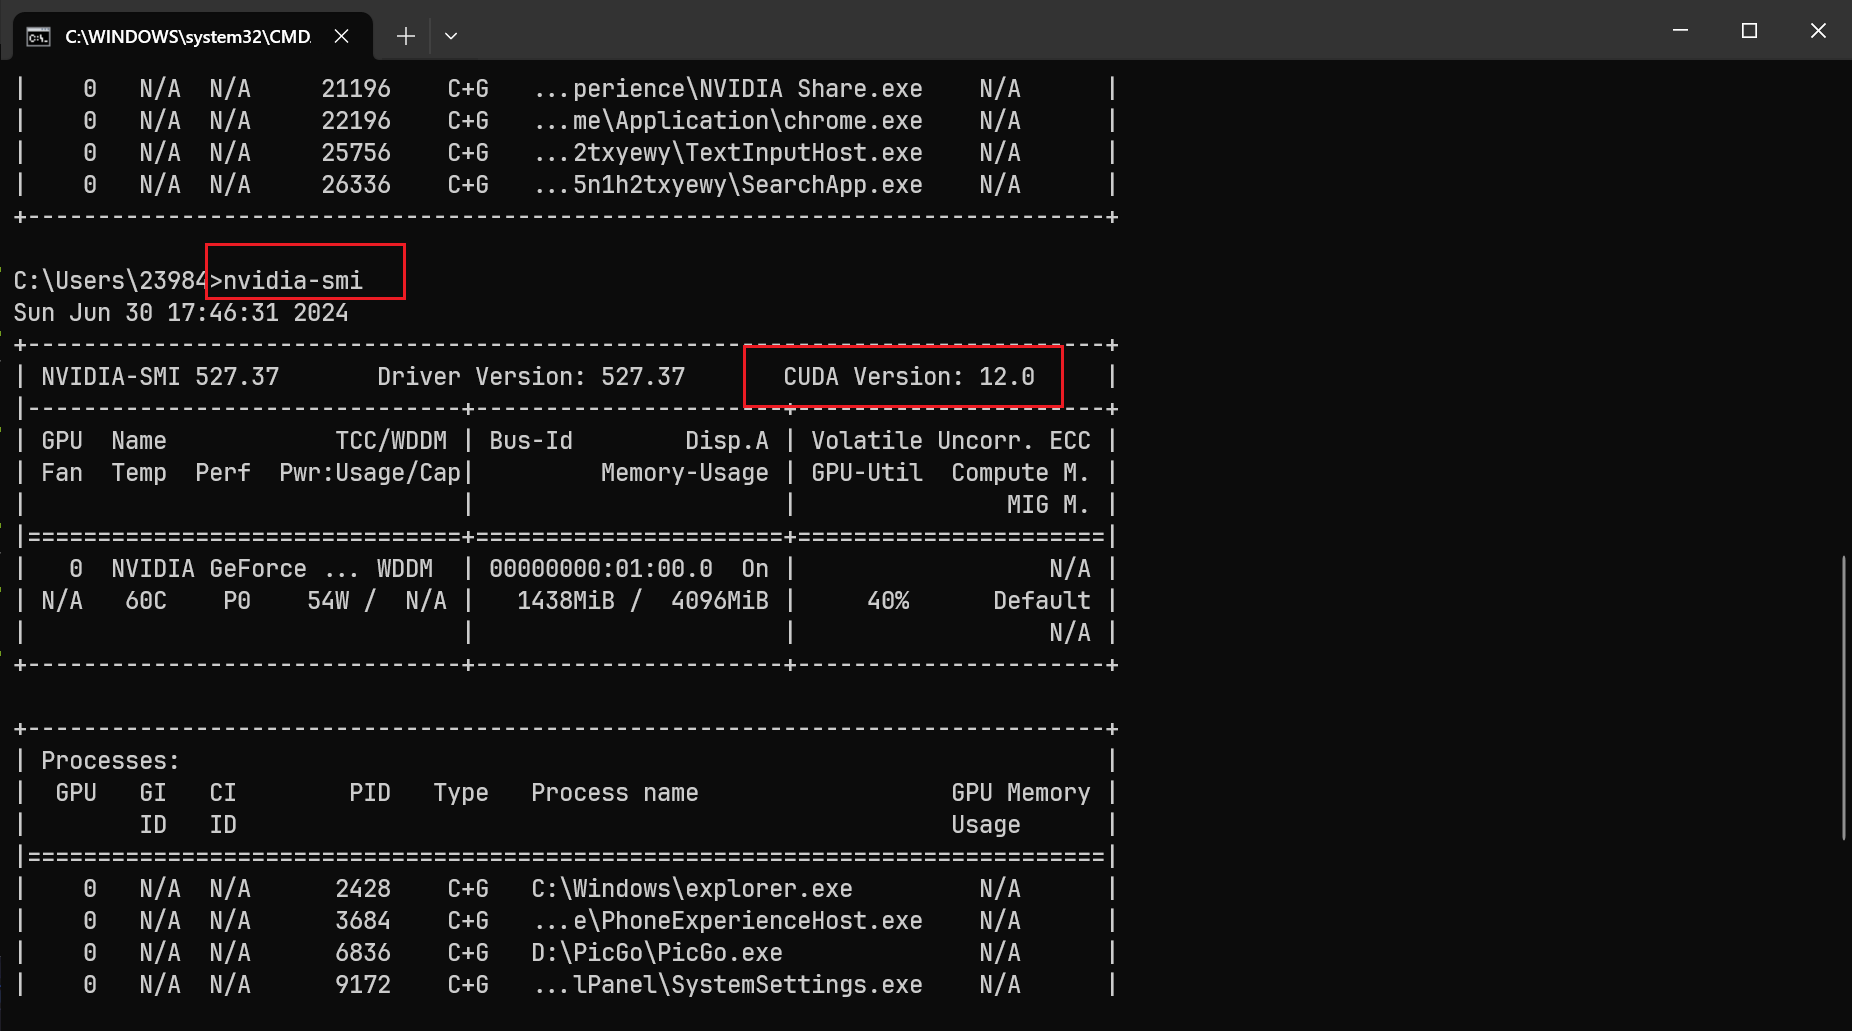
在终端命令行输入:nvidia-smi查看 CUNDA 版本,在安装
pytorch 时需要注意版本:CONDA > conda
更改 jupyter 默认打开目录
首先使用以下命令生成 jupyter
配置文件,生成的文件一般在C:\Users\用户名\.jupyter文件夹内
1 jupyter notebook --generate-config
查找该文件中的c.NotebookApp.notebook_dir更改为c.NotebookApp.notebook_dir = 'F:\Jupyter'并保存,此时默认路径就更改为'F:\Jupyter'
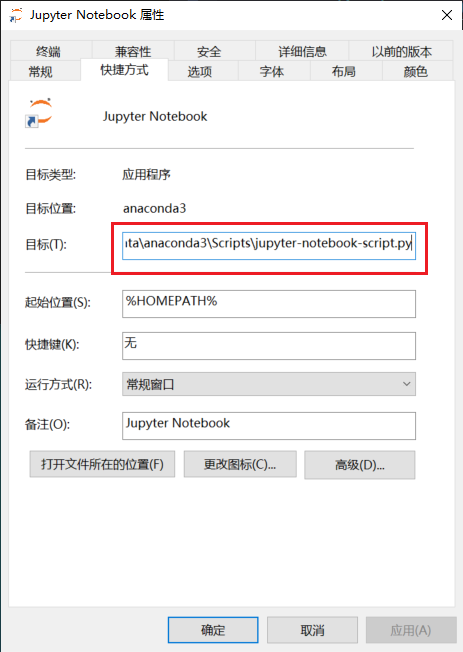
修改 jupyter
快捷方式的打开方式,删除后面的环境变量,至此修改成功。
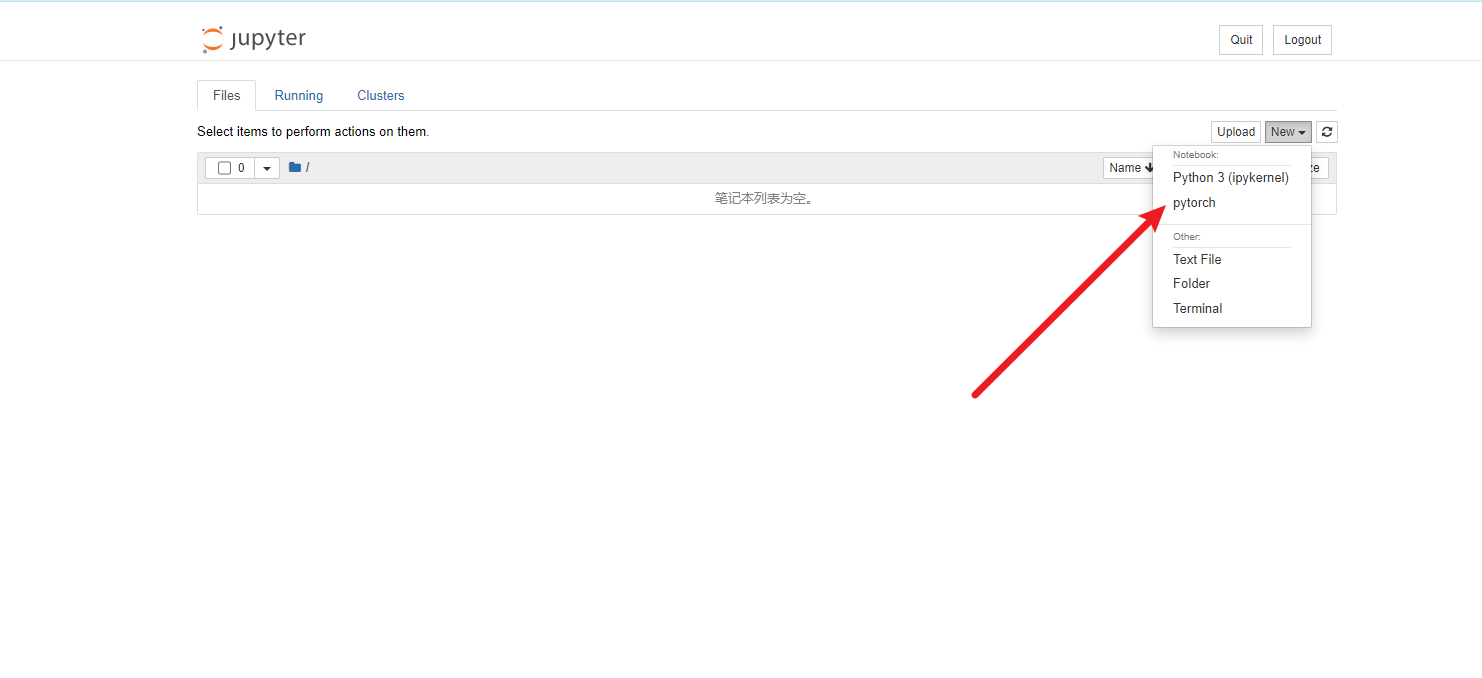
将 conda 虚拟环境关联至
jupyter
安装 ipykernel
1
2
conda activate pytorch
导入
1 python -m ipykernel install --user --name=pytorch
测试 conda 是否可用
2、DNN 基本原理
主要可分为以下 4 个步骤:
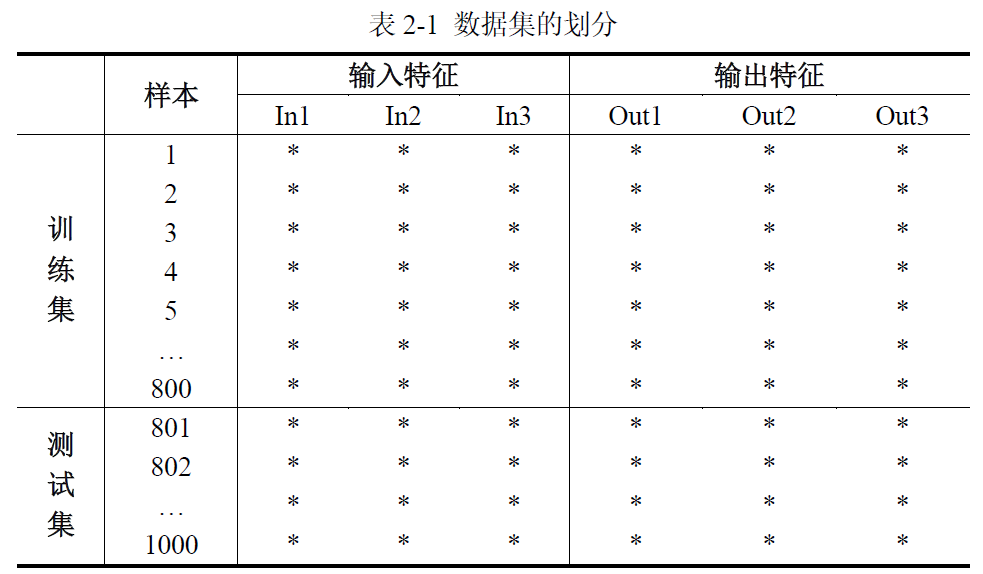
划分数据集
训练网络
测试网络
使用网络
2.1 划分数据集
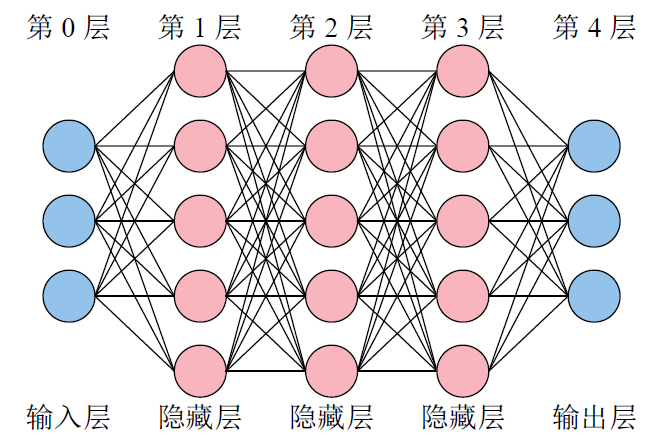
神经网络的结构
考虑到 Python 列表、NumPy 数组以及 PyTorch
张量都是从索引[0]开始,再加之输入层没有内部参数(权重 ω 与偏置
b),所以习惯将输入层称之为第 0 层。
2.2 训练网络
神经网络的训练过程,就是经过很多次前向传播与反向传播的轮回,最终不断调整其内部参数(权重
ω 与偏置 b),以拟合任意复杂函数的过程。内部参数一开始是随机的(如
Xavier 初始值、He 初始值),最终会不断优化到最佳。
习惯把内部参数称为参数,外部参数称为超参数。
(1)前向传播
将单个样本的 3
个输入特征送入神经网络的输入层后,神经网络会逐层计算到输出层,最终得到神经网络预测的
3 个输出特征。
该神经元节点的计算过程为\(y=\omega_1x_1+\omega_2x_2+\omega_3x_3+b\) 。你可以理解为,每一根
线就是一个权重 ω,每一个神经元节点也都有它自己的偏置
b。当然,每个神经元节点在计算完后,由于这个方程是线性的,因此必须在外面套一个非线性的函数:\(y=\sigma\left(\omega_1x_1+\omega_2x_2+\omega_3x_3+b\right)\)
,σ 被称为激活函数。如果你不套非线性函数,那么即使 10
层的网络,也可以用 1 层就拟合出同样的方程。
(2)反向传播
经过前向传播,网络会根据当前的内部参数计算出输出特征的预测值。为计算预测值与真实值之间的差距,需要一个损失函数。
损失函数计算好后,逐层退回求梯度。即看每一个内部参数是变大还是变小,才会使得损失函数变小。这样就达到了优化内部参数的目的。
关键参数:外部参数叫学习率。学习率越大,内部参数的优化越快,但过大的学习率可能会使损失函数越过最低点,并在谷底反复横跳。
(3)batch_size
前向传播与反向传播一次时,有三种情况:
批量梯度下降(Batch Gradient
Descent,BGD),把所有样本一次性输入进网络,这种方式计算量开销很大,速度也很慢。
随机梯度下降(Stochastic Gradient
Descent,SGD),每次只把一个样本输入进网络,每计算一个样本就更新参数。这种方式虽然速度比较快,但是收敛性能差,可能会在最优点附近震荡,两次参数的更新也有可能抵消。
小批量梯度下降(Mini-Batch Gradient
Decent,MBGD)是为了中和上面二者而生,这种办法把样本划分为若干个批,按批来更新参数。
PyTorch 只支持批量与小批量
(4)epochs
1 个 epoch 就是指全部样本进行 1 次前向传播与反向传播。
假设有 10240 个训练样本,batch_size 是 1024,epochs 是 5。那么:
全部样本将进行 5 次前向传播与反向传播;
1 个 epoch,将发生 10 次(10240x1024)前向传播与反向传播;
一共发生 50 次(105)前向传播和反向传播。
2.3 测试网络
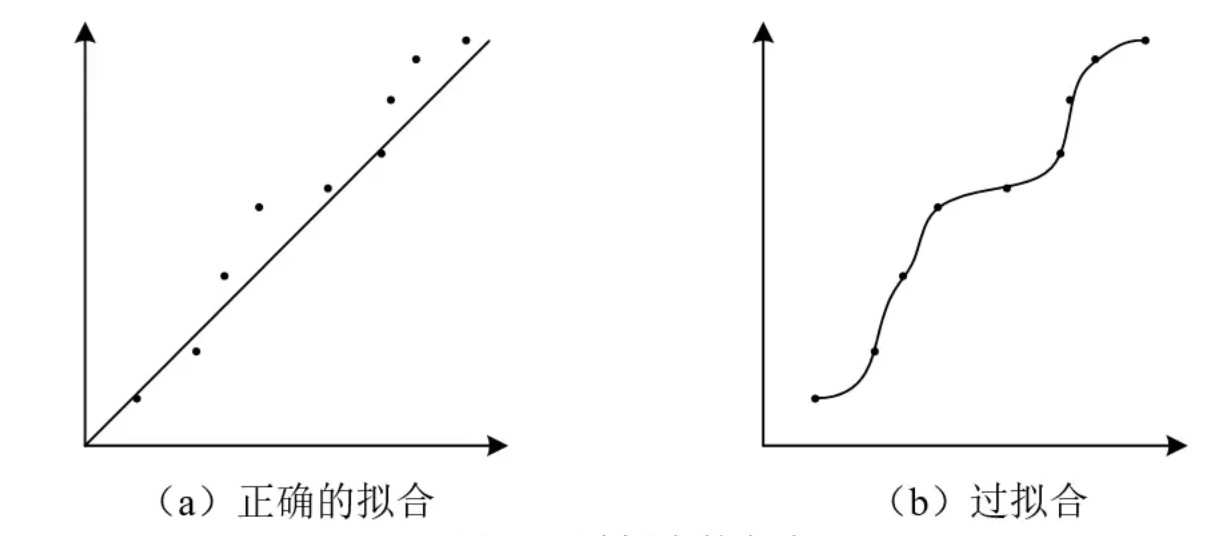
目的:防止过拟合。
过拟合:网络优化好的内部参数支队本训练样本有效。
测试集时,只需要一次前向传播。
2.4 使用网络
直接将样本进行 1 次前向传播。
3、DNN 的实现
3.1 制作数据集
1
2
3
4
5
6
7
8
9
10
11
12
13
14
15
16
17
18
19
20
21
22
23
24
25
import torchimport torch.nn as nnimport matplotlib.pyplot as pltfrom matplotlib_inline import backend_inline'svg' )10000 ,1 ) 10000 ,1 ) 10000 ,1 ) 1 ).float () 1 <(X1+X2+X3)) & ((X1+X2+X3)<2 ) ).float () 2 ).float () 1 ) 'cuda:0' ) int (len (Data) * 0.7 ) len (Data) - train_size 0 )) , : ]
3.2 搭建神经网络
通常以 nn.Module
作为父类,自己的神经网络可直接继承父类的方法和属性。
在定义神经网络时通常需要包含 2
个方法,__init__和forward
__init__:用于构建自己的神经网络forward:用于输入数据进行向前传播
(1)搭建神经网络结构
1
2
3
4
5
6
7
8
9
10
11
12
13
14
class DNN (nn.Module):def __init__ (self ):''' 搭建神经网络各层 ''' super (DNN,self).__init__()3 , 5 ), nn.ReLU(), 5 , 5 ), nn.ReLU(), 5 , 5 ), nn.ReLU(), 5 , 3 ) def forward (self, x ):''' 前向传播 ''' return y
代码解析
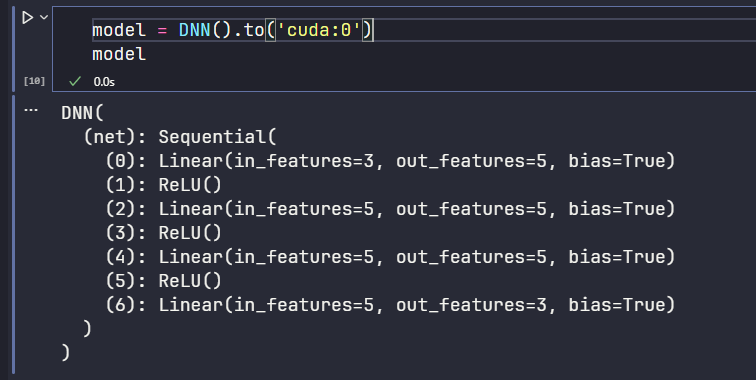
1 nn.Linear(3 , 5 ), nn.ReLU()
表示一个隐藏层,第一个隐藏层为线性层,搜嘎会给你一个神经元节点数是
3,这层节点数是 5
后面的nn.ReLU()表示一个激活函数
代码解析
1 2 3 4 nn.Linear(3 , 5 ), nn.ReLU(), 5 , 5 ), nn.ReLU(), 5 , 5 ), nn.ReLU(), 5 , 3 )
第二层的第一个数要和第一层的第二个数对应
(2)创建神经网络
创建 model 实例,并将其转移掉 gpu 上
每个隐藏层都有一个激活函数。
各层的神经元节点数位 3 5 5 5 3
输入层的神经元数量必须与每个样本的输入特征数量一致,输出层的神经数量必须与每个样本的输出特征数量一致。
3.3 网络的内部参数
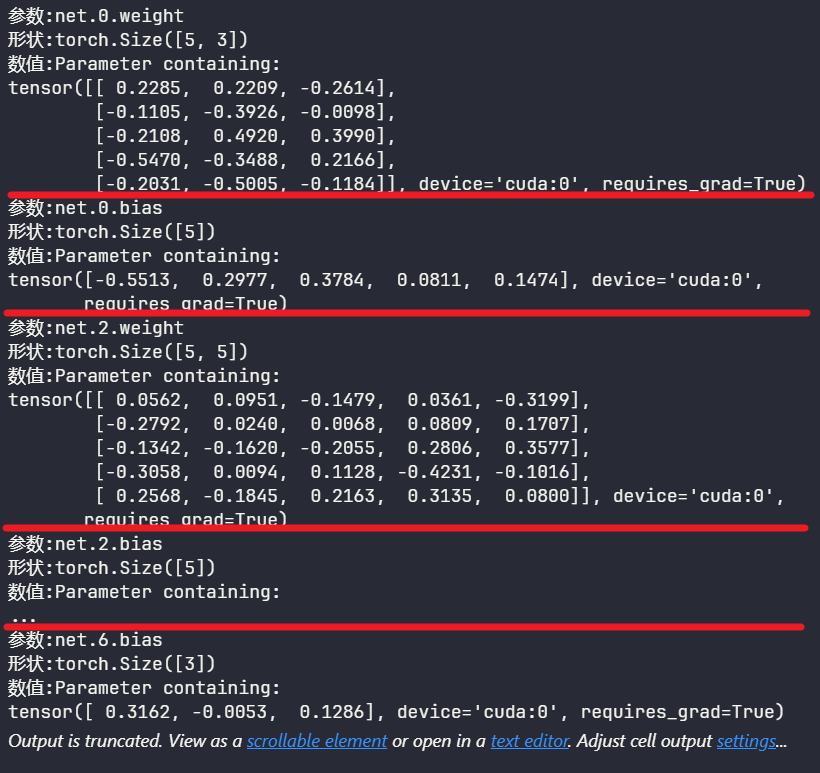
权重与偏置
查看网络内部参数
1
2
for name,param in model.named_parameters():print (f"参数:{name} \n形状:{param.shape} \n数值:{param} " )
net.0.weight 权重形状为[5,3],5 表示自己的节点数,3
表示前一层的节点数
device='cuda:0'表示在 gpu 上requires_grad=True表示打开梯度计算功能
3.4 网络外部参数
又叫超参数。
搭建网络时的超参数:网络的层数、各隐藏层节点数、各节点激活函数、内部参数的初始值等。
训练网络时的超参数:损失函数、学习率、优化算法、batch_size、epochs
等。
(1)激活函数
引入非线性因素,从而使神经网络能够学习和表达更加复杂的函数关系。
官网
https://cloud.tencent.com/developer/article/1797190
(2)损失函数
计算神经网络每次迭代的前向计算结果与真实值的差距,从而指导下一步的训练向正确的方向进行。
官网
1 2 3 4 5 6 0.01
3.5 训练网路
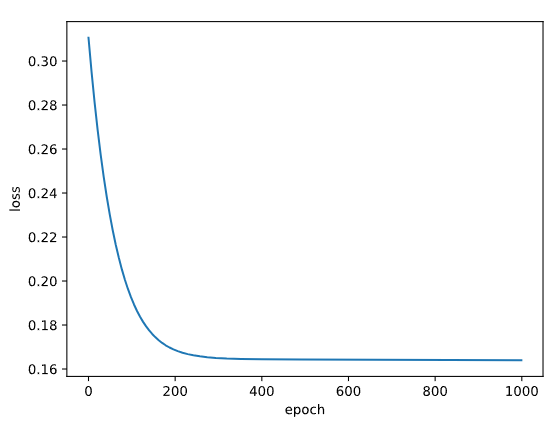
1 2 3 4 5 6 7 8 9 10 11 12 13 14 15 16 17 1000 3 ] 3 : ] for epoch in range (epochs):range (epochs), losses)'loss' ), plt.xlabel('epoch' )
3.6 测试神网络
1 2 3 4 5 6 7 8 9 10 11 3 ] 3 :] with torch.no_grad(): 1 )] = 1 1 ] = 0 sum ( (Pred == Y).all (1 ) ) 0 ) print (f'测试集精准度: {100 *correct/total} %' )
3.7 保存与导入网络
1 2 3 4 5 6 7 8 9 10 11 12 13 14 15 16 17 'model.pth' )'model.pth' )3 ] 3 :] with torch.no_grad(): 1 )] = 1 1 ] = 0 sum ( (Pred == Y).all (1 ) ) 0 ) print (f'测试集精准度: {100 *correct/total} %' )
4、批量梯度下降案例代码
1
2
3
4
5
6
7
8
9
10
11
12
13
14
15
16
17
18
19
20
21
22
23
24
25
26
27
28
29
30
31
32
33
34
35
36
37
38
39
40
41
42
43
44
45
46
47
48
49
50
51
52
53
54
55
56
57
58
59
60
61
62
63
64
65
66
67
68
69
70
71
72
73
74
75
76
77
78
79
80
import numpy as npimport pandas as pdimport torchimport torch.nn as nnimport matplotlib.pyplot as pltfrom matplotlib_inline import backend_inline'svg' )'Data.csv' , index_col=0 ) 'cuda' ) int (len (ts) * 0.7 ) len (ts) - train_size 0 ) ) , : ] class DNN (nn.Module):def __init__ (self ):''' 搭建神经网络各层 ''' super (DNN,self).__init__()8 , 32 ), nn.Sigmoid(), 32 , 8 ), nn.Sigmoid(), 8 , 4 ), nn.Sigmoid(), 4 , 1 ), nn.Sigmoid() def forward (self, x ):''' 前向传播 ''' return y 'cuda:0' ) 'mean' )0.005 5000 1 ] 1 ].reshape((-1 ,1 )) for epoch in range (epochs):range (epochs), losses)'loss' )'epoch' )1 ] 1 ].reshape((-1 ,1 )) with torch.no_grad(): 0.5 ] = 1 0.5 ] = 0 sum ( (Pred == Y).all (1 ) ) 0 ) print (f'测试集精准度: {100 *correct/total} %' )
5、小批量梯度下降
在使用小批量梯度下降时,必须使用 3 个 PyTorch
内置的实用工具(utils):
DataSet 用于封装数据集;
DataLoader 用于加载数据不同的批次;
random_split 用于划分训练集与测试集
1
2
3
4
5
6
7
8
9
10
11
12
13
14
15
16
17
18
19
20
21
22
23
24
25
26
27
28
29
30
31
32
33
34
35
36
37
38
39
40
41
42
43
44
45
46
47
48
49
50
51
52
53
54
55
56
57
58
59
60
61
62
63
64
65
66
67
68
69
70
71
72
73
74
75
76
77
78
79
80
81
82
83
84
85
86
87
88
89
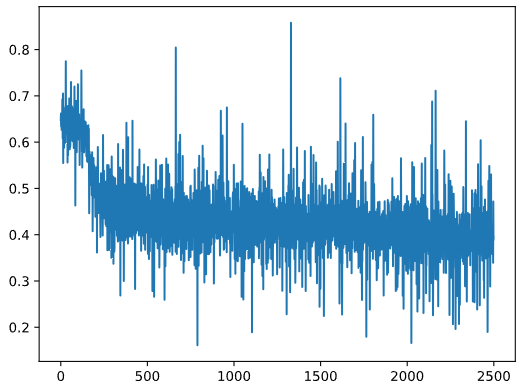
import numpy as npimport pandas as pdimport torchimport torch.nn as nnfrom torch.utils.data import Datasetfrom torch.utils.data import DataLoaderfrom torch.utils.data import random_splitimport matplotlib.pyplot as pltfrom matplotlib_inline import backend_inline'svg' )class MyData (Dataset ): def __init__ (self, filepath ):0 ) 'cuda' ) 1 ] 1 ].reshape((-1 ,1 )) len = ts.shape[0 ] def __getitem__ (self, index ):return self.X[index], self.Y[index]def __len__ (self ):return self.len 'Data.csv' )int (len (Data) * 0.7 ) len (Data) - train_size True , batch_size=128 ) False , batch_size=64 ) class DNN (nn.Module):def __init__ (self ):''' 搭建神经网络各层 ''' super (DNN,self).__init__()8 , 32 ), nn.Sigmoid(), 32 , 8 ), nn.Sigmoid(), 8 , 4 ), nn.Sigmoid(), 4 , 1 ), nn.Sigmoid() def forward (self, x ):''' 前向传播 ''' return y 'cuda:0' ) 0.005 500 for epoch in range (epochs):for (x, y) in train_loader: range (len (losses)), losses)0 0 with torch.no_grad(): for (x, y) in test_loader: 0.5 ] = 1 0.5 ] = 0 sum ( (Pred == y).all (1 ) )0 )print (f'测试集精准度: {100 *correct/total} %' )
小批量时针对局部进行向前向后,所以出来的损失函数不是梯度下降的。
6、手写数字识别
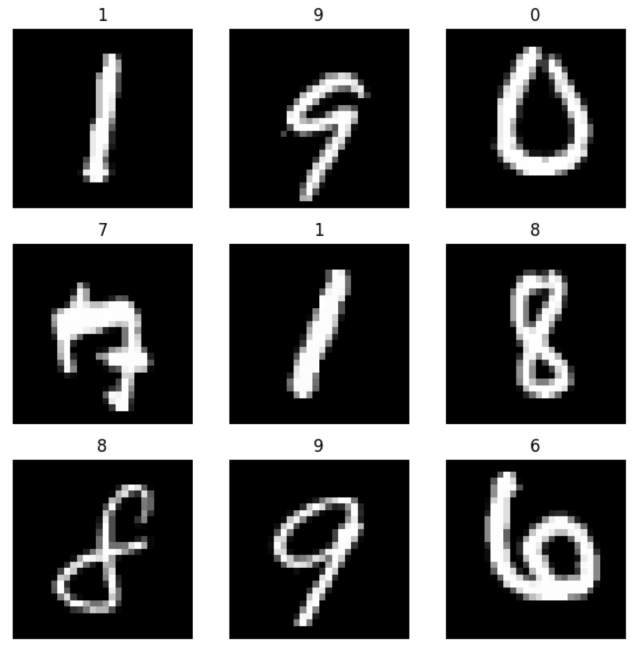
手写数字识别数据集(MNIST)是机器学习领域的标准数据集
输入:一副图像
输出:一个与图像中对应的数字(0 至 9
之间的一个整数,不是独热编码)
我们不用手动将输出转换为独热编码,PyTorch
会在整个过程中自动将数据集的输出转换为独热编码.只有在最后测试网络时,我们对比测试集的预测输出与真实输出时,才需要注意一下。
1
2
3
4
5
6
7
import torchimport torch.nn as nnfrom torch.utils.data import DataLoaderfrom torchvision import transforms from torchvision import datasetsimport matplotlib.pyplot as plt
下载时需要开启全局代理
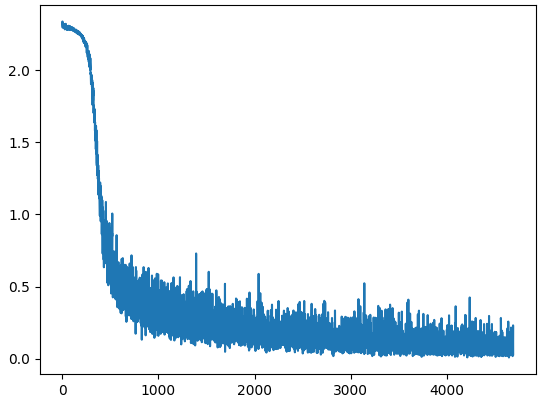
1 2 3 4 5 6 7 8 9 10 11 12 13 14 15 16 17 18 19 20 21 22 23 24 25 26 27 28 29 30 31 32 33 34 35 36 37 38 39 40 41 42 43 44 45 46 47 48 49 50 51 52 53 54 55 56 57 58 59 60 61 62 63 64 65 66 67 68 69 70 71 72 73 74 75 76 77 78 79 80 81 82 83 84 85 86 87 0.1307 , 0.3081 )'F:\Jupyter\pytorch\dataset\mnist' , True , True , 'F:\Jupyter\pytorch\dataset\mnist' , False , True , True , batch_size=64 )False , batch_size=64 )''' 每个样本的输入都是形状为2828的二维数组,那么对于 DNN 来说,输入层的神经元节点就要有28x28 = 784个;输出层使用独热编码,需要 10 个节点。 ''' class DNN (nn.Module):def __init__ (self ):''' 搭建神经网络各层 ''' super (DNN,self).__init__()784 , 512 ), nn.ReLU(), 512 , 256 ), nn.ReLU(), 256 , 128 ), nn.ReLU(), 128 , 64 ), nn.ReLU(), 64 , 10 ) def forward (self, x ):''' 前向传播 ''' return y 'cuda:0' ) 0.01 0.5 5 for epoch in range (epochs):for (x, y) in train_loader: 'cuda:0' ), y.to('cuda:0' )range (len (losses)), losses)0 0 with torch.no_grad(): for (x, y) in test_loader: 'cuda:0' ), y.to('cuda:0' )max (Pred.data, dim=1 )sum ( (predicted == y) )0 )print (f'测试集精准度: {100 *correct/total} %' )
测试集精准度: 97.06999969482422 %
